Overview
Account selection is the easy part of account based-sales.
While not trivial, a quick look into the data dimensions—industry, employee count, business model, fundraising, revenue—provides a rough starting point for account selection.
Take our own use case at Common Room for example. Just a quick glance at our customer page, and it’s safe to infer that our ideal customers look something like technology companies (industry) with enough traction (employee size/revenue) to invest in developer relations and community building.
Put those parameters into an account selection tool (we’re fans of Keyplay), and you’ll get a decent list of accounts.
What to do your sellers do with that list? That’s the hard part.
In this playbook, we’ll show you how to surface meaningful activity from target accounts (and people at those accounts!) across every part of the customer journey.
What you’ll need
Step 1: Connect relevant data sources
For this example, imagine we have an open-source product with a fair amount of traction—hundreds of contributors, thousands of stars, etc.
While the self-hosted version of our product is great, many of our larger customers want a managed version with collaboration features.
With this in mind, we can start by connecting to digital channels like GitHub, Slack, Twitter, and LinkedIn to pull relevant user activity into one place—Common Room.
Let’s start by connecting Slack (what we use for community management in this hypothetical). To do that, we can head over to Settings in Common Room and choose to connect to Slack.
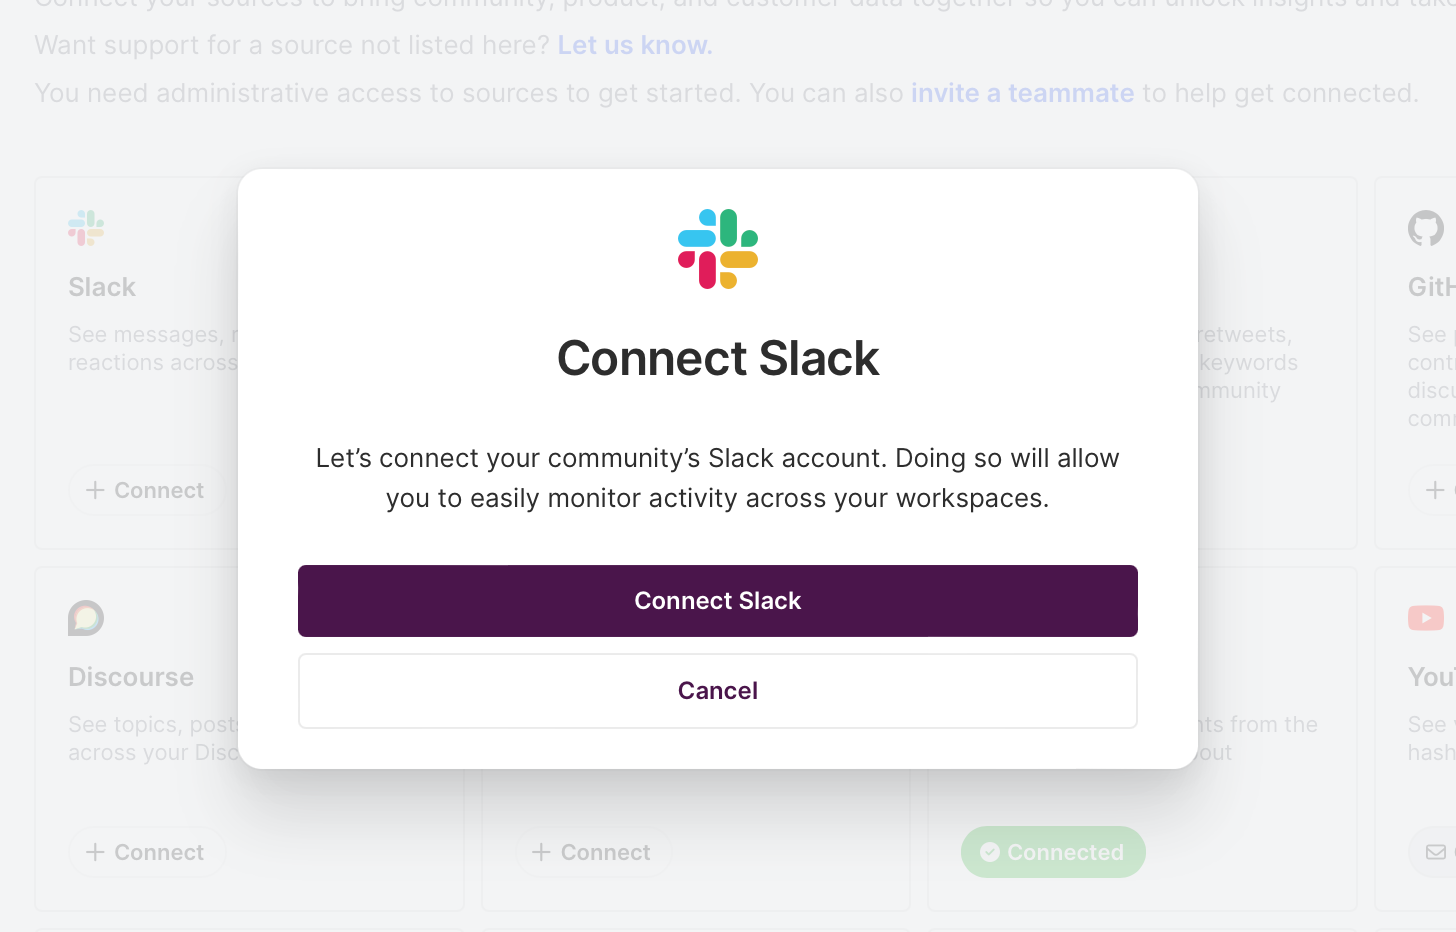
Follow the connection prompts, authenticate, and you’ll start seeing Slack activity in Common Room after a few minutes.
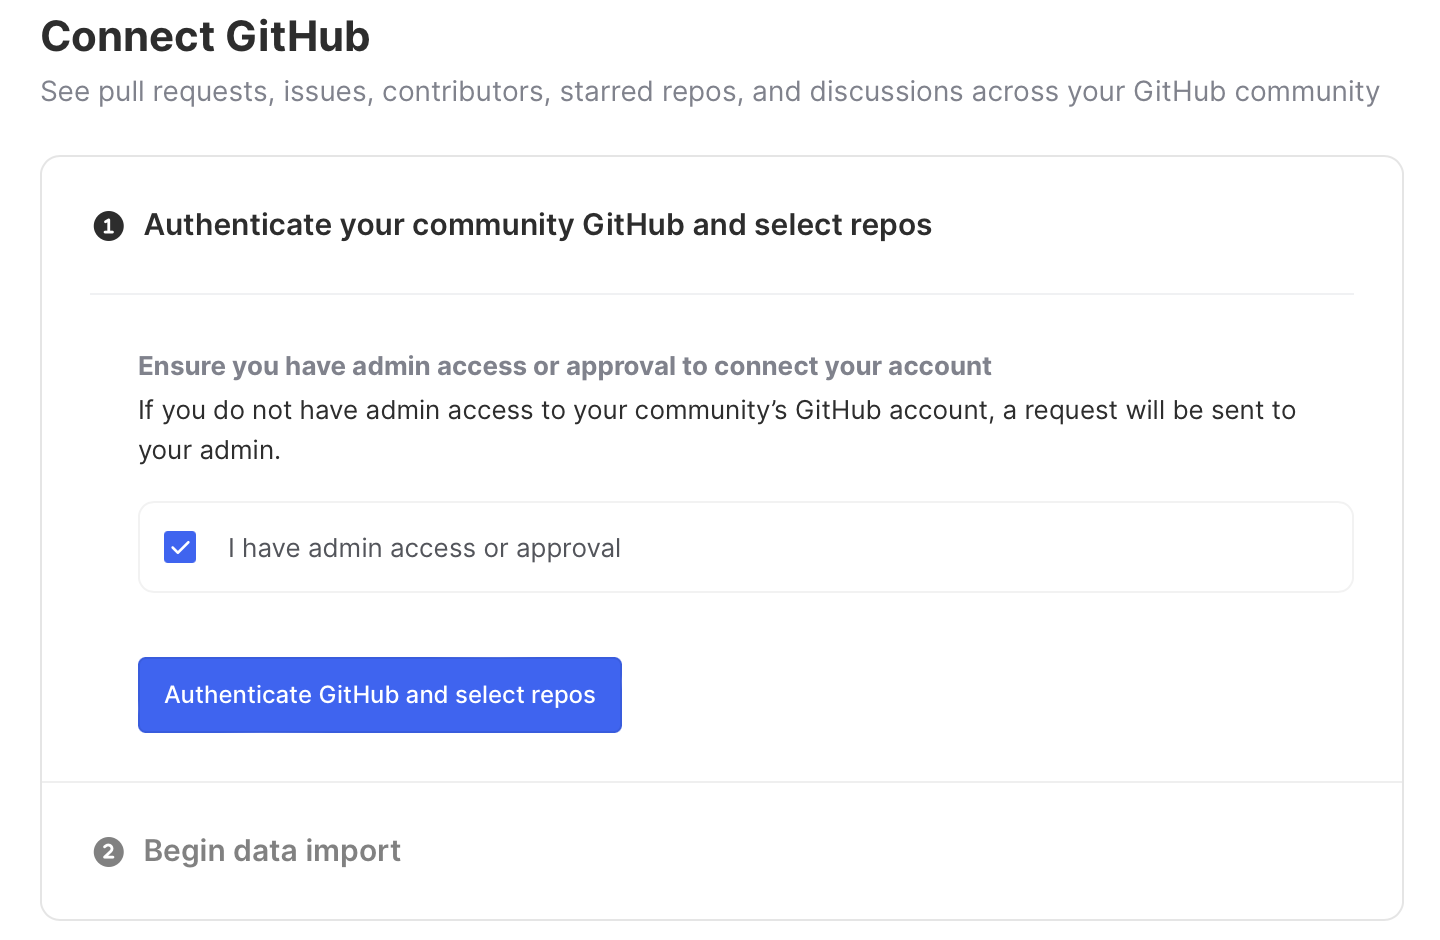
We’ll connect to GitHub next. We can repeat the same steps from before, and this time select GitHub. And from here, we can choose the GitHub repositories we’d like to connect to.
Now we have two sources passing data into Common Room. We can easily add more by repeating the same process for relevant digital channels like Twitter, LinkedIn and business data sources like Salesforce, Snowflake, and HubSpot.
Step 2: Tag your target accounts
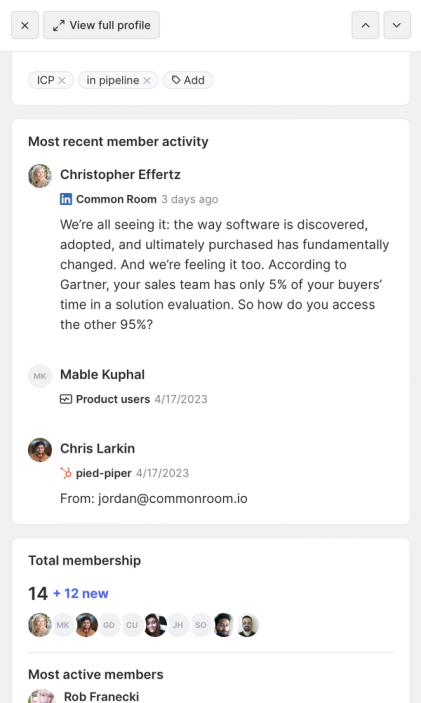
Assuming we've connected a handful of sources, we'll see contact and organization activity populate in Common Room. We'll then want to tag accounts that look similar to our customers on the hosted version of our product.
For that, we can head over to the Organizations menu. Here we’ll see activity from all matched accounts (6000 in this example). Not all accounts fit our ideal customer requirements, so we can select + Add filter to narrow our list to only organizations that meet our criteria.
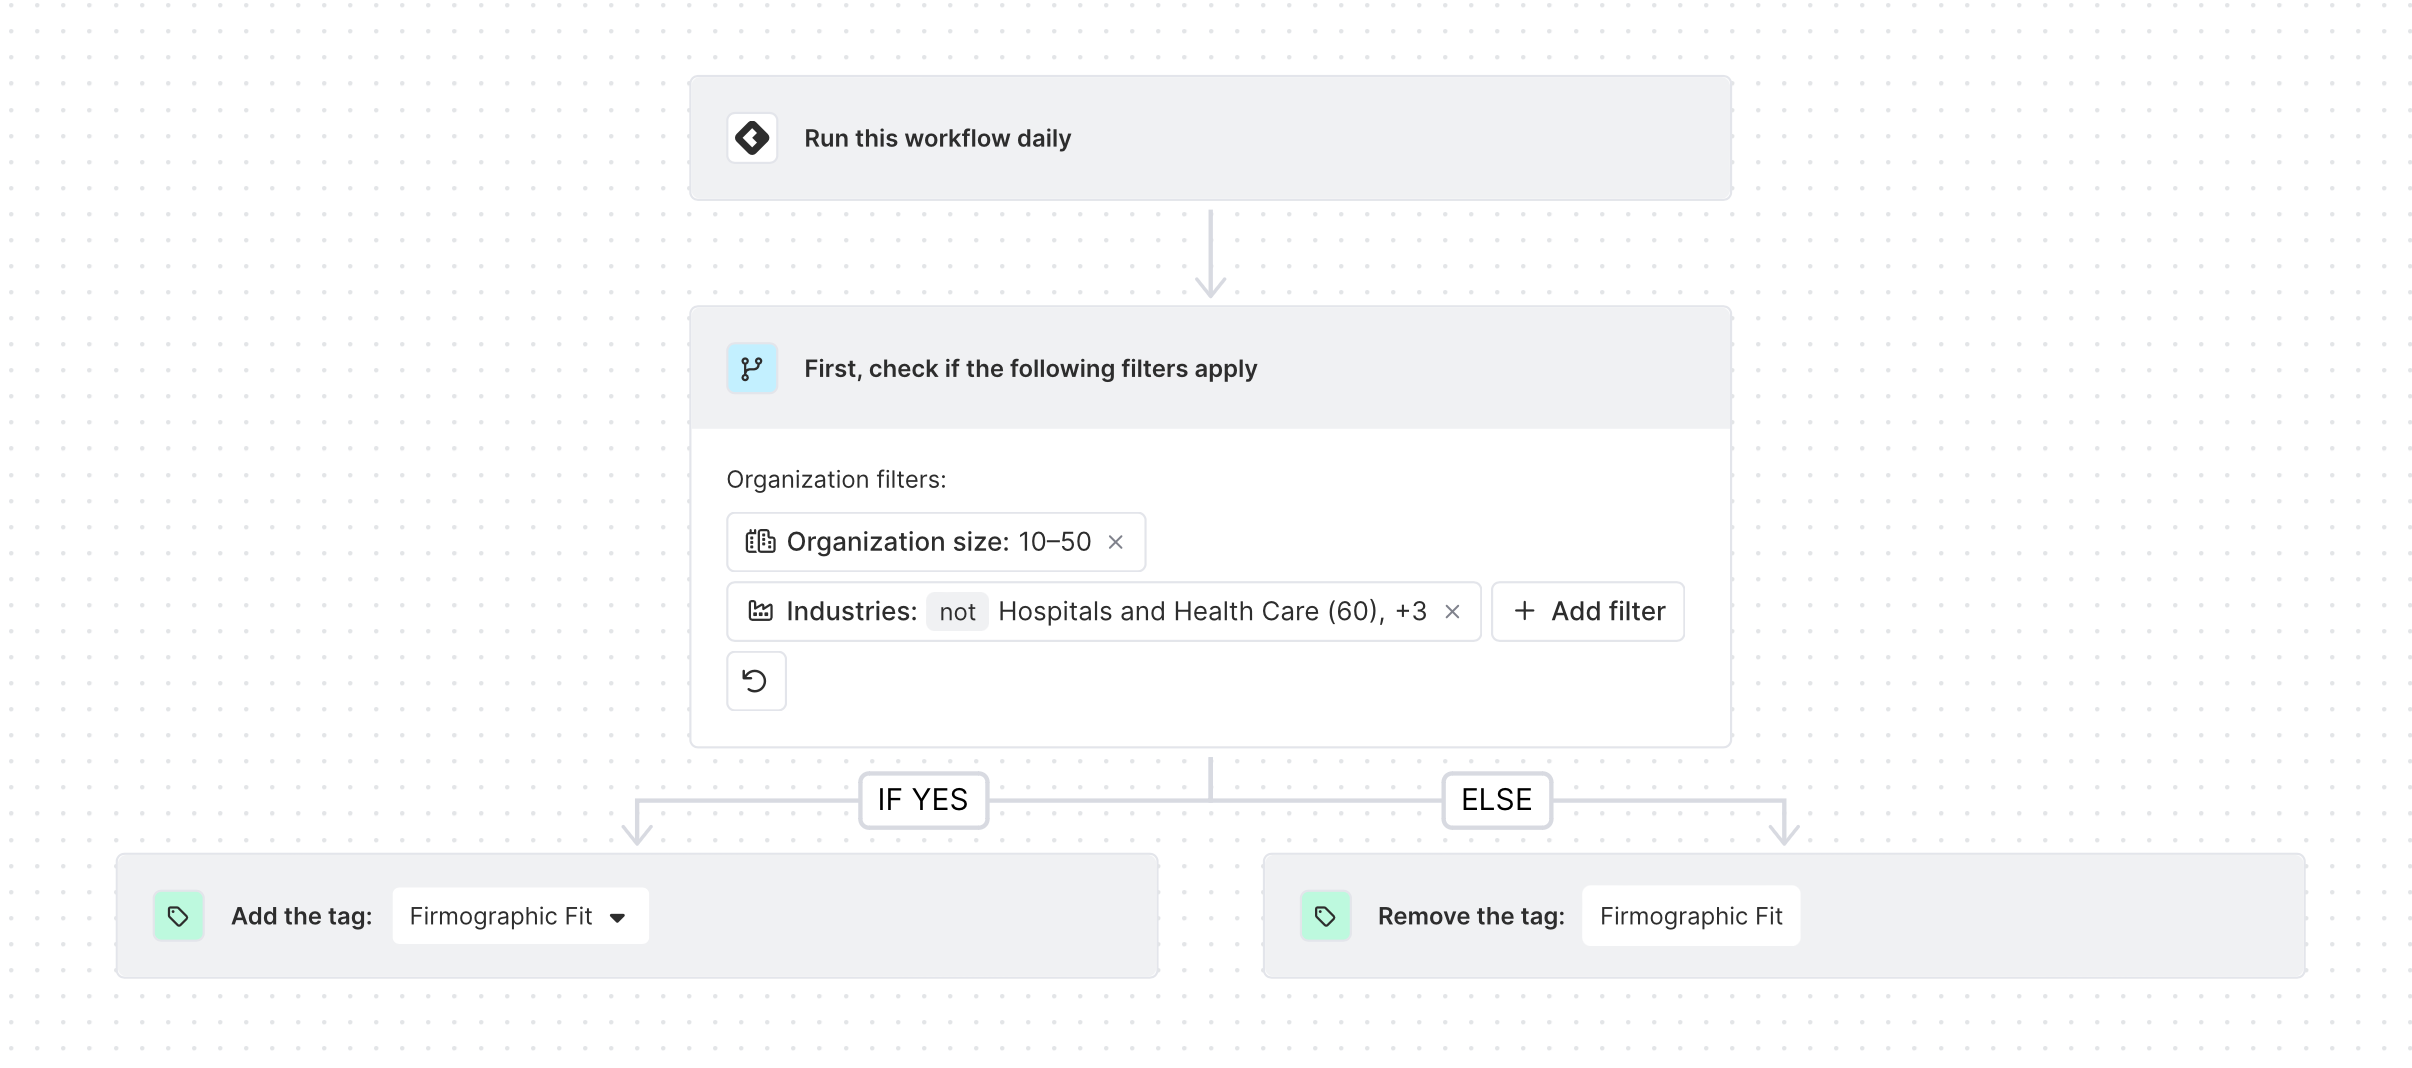
We’ll add filters to only companies with more than ten employees.
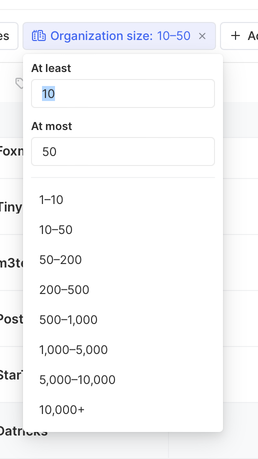
And we'll also want to exclude healthcare companies because we don't yet have HIPAA compliance. We can do that by selecting not rather than or on our industry filter.

That narrows our list of ideal organizations to about 1400, which feels about right. Now, we’ll want to add a tag to those organizations.
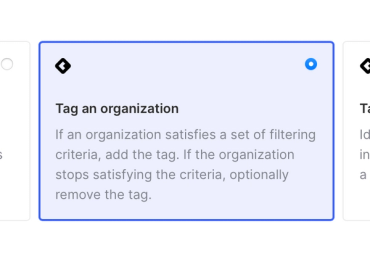
For that, we can create a workflow to auto-tag organizations. Head over to the Workflows menu and select + New workflow. And we’ll scroll to select Tag an organization workflow.
We can simply add the filters from our previous exploration (org > 10 and not in healthcare), click Save, and turn the workflow.
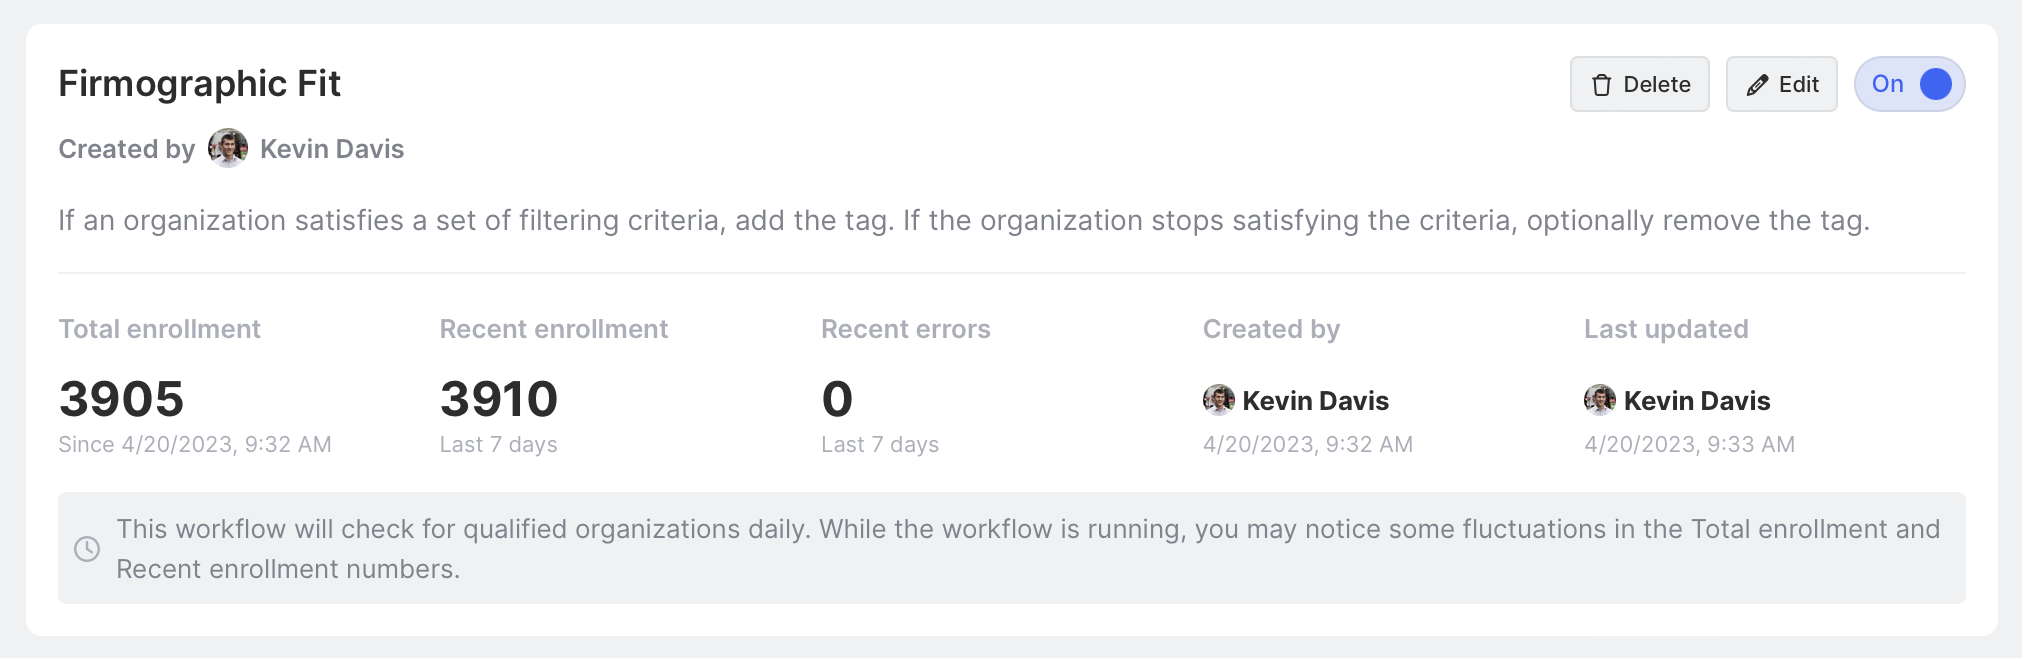
After turning the workflow on, we’ll see enrollment populate in the Workflows overview. This will continuously update, so if a new organization meets our criteria, it will automatically be tagged as it reaches the threshold we’ve set.
Great! Now that we’ve tagged organizations within our ideal customer profile with an firmographic fit tag, we can create segments based on contact and account activity to take action.
Step 3: Create a segment to track target account activity
In this step, we’ll combine firmographic account fit with relevant activity from contacts. This makes all the difference when it comes to account prioritization and taking action with context.
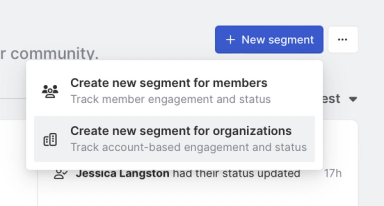
We’ll first head over to the Segment view in Common Room and create a new segment of our organizations with a firmographic fit.
We’ll click + New segment, create a new organization segment and give it a clear, descriptive title.
We won’t add Statuses for now.
After creating the segment, we’ll need to configure parameters to include organizations. Click the Organization management tab and set criteria to add organizations with the firmographic fit tag to our new segment.
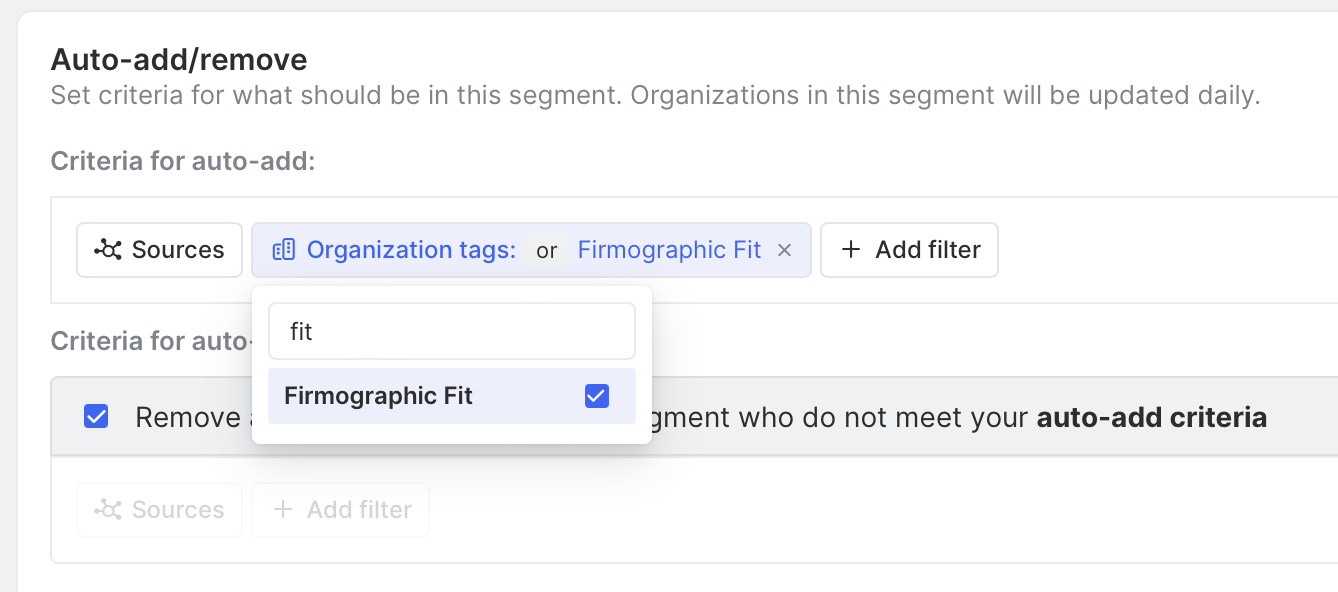
This will add target accounts to our segment with No status.
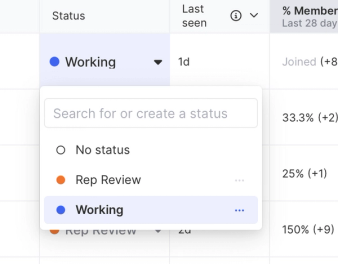
From here, we’ll want to create a view for our reps to review recently active target accounts. We can create a new status and name it something like “Rep Review.”
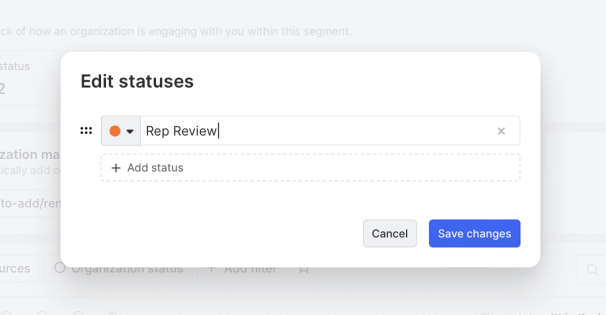
We'll need to set rules to automatically apply our newly created status to qualifying accounts. So we’ll go back into the Organization management tab and click Set criteria.

We're looking for organizations with more than one contact who has also been active in the last seven days.
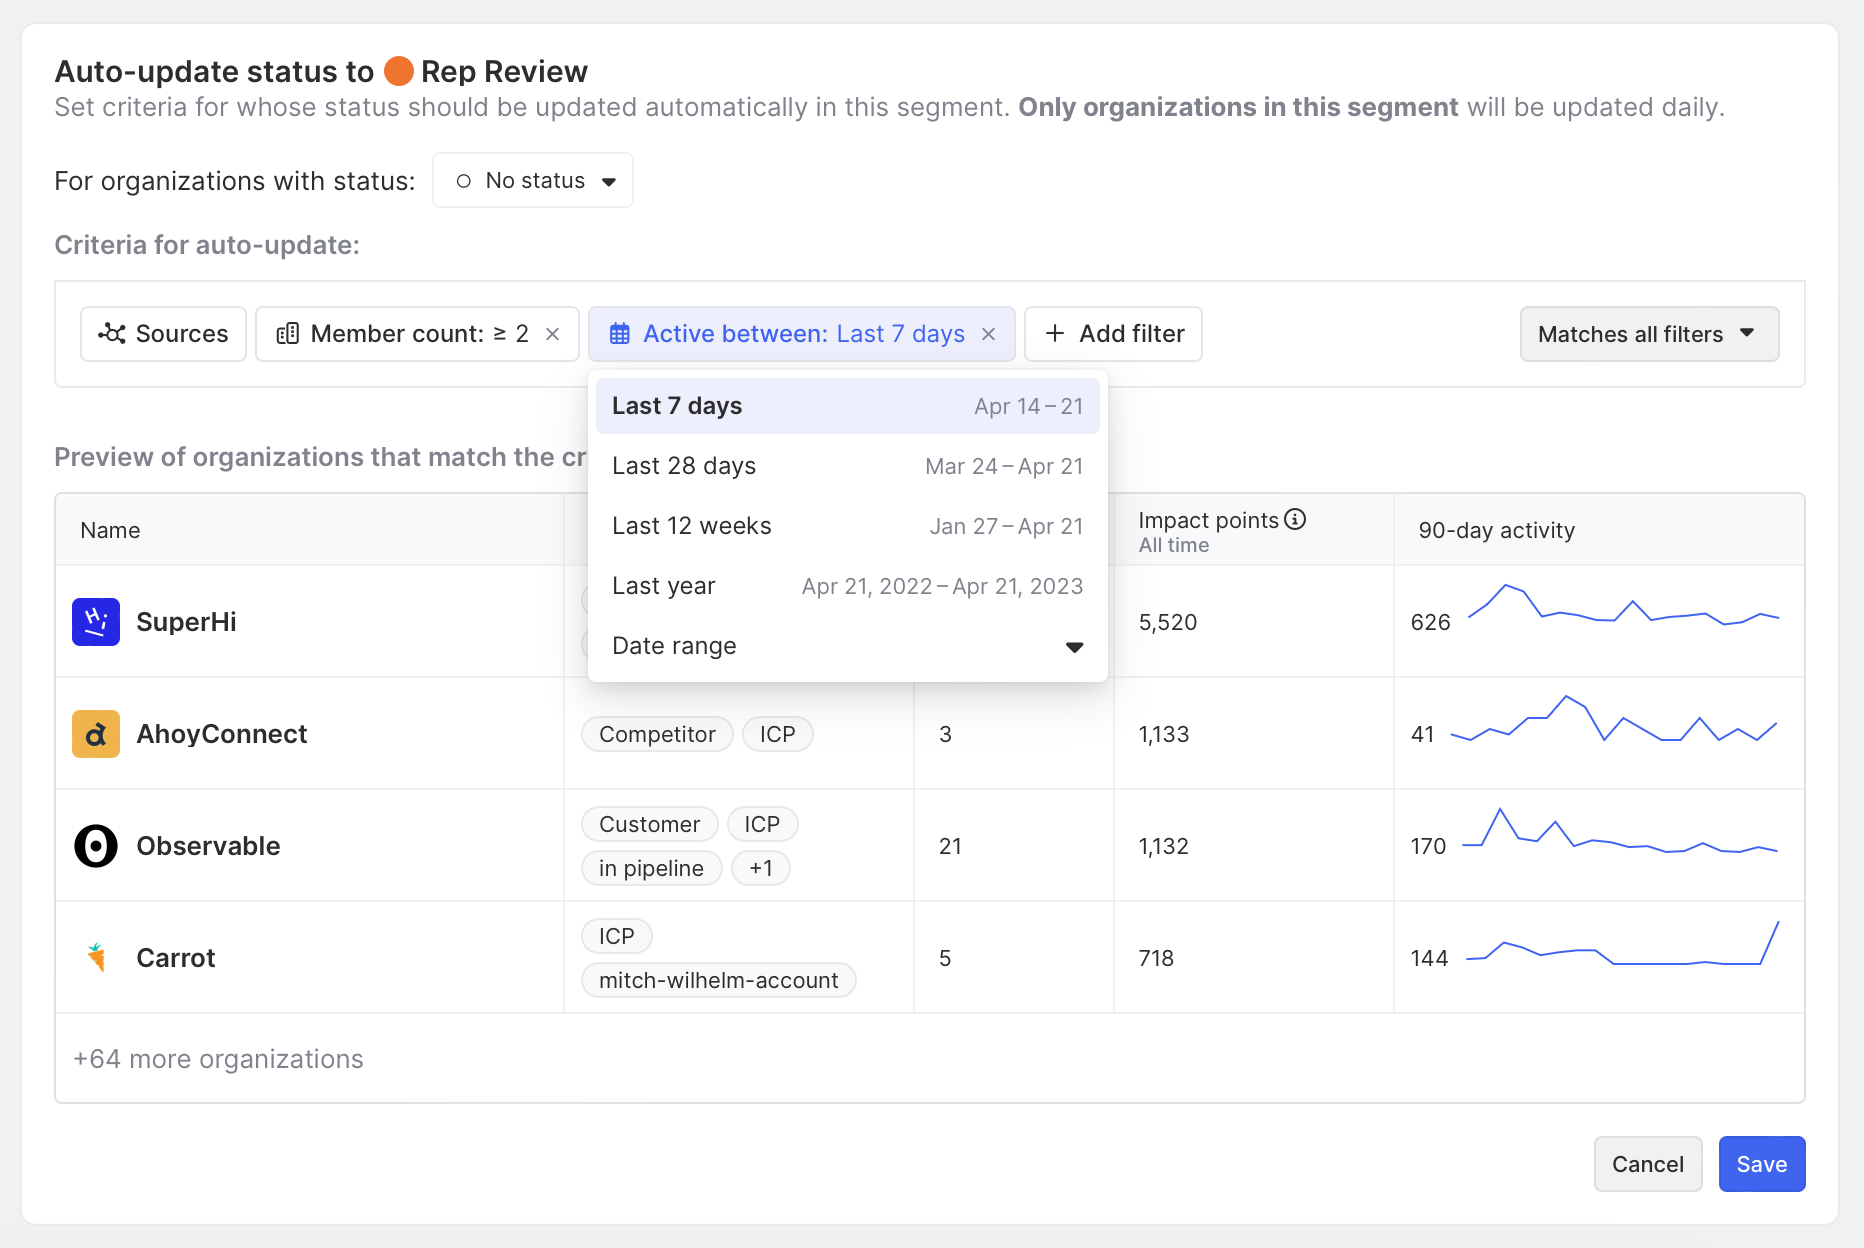
After clicking Save, organizations who qualify will automatically be moved to our new “Rep Review” status.
And now, we have a cohort of active target accounts with more than one contact for our reps to review and burn down daily.
But wait… there’s more! In the couple of next steps, we’ll optimize our views and workflow to make it even easier for our team to follow up.
Step 4: Customize account views for more efficient follow up
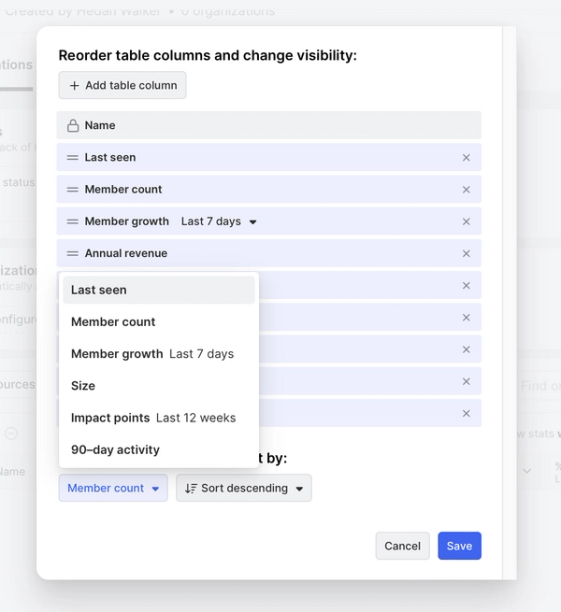
We can further optimize our segment by adding custom columns that surface account information relevant for follow-up.
We can click the ✏️ icon to add, remove, and reorder columns. We want our reps to prioritize by recent activity, contact growth, and revenue in that order. So we’ll adjust our columns to reflect that.
Revenue growth is not a default column, so we'll add that to our view. We’ll also rearrange columns, sort by last seen, and click Save to update our view.
Our team now has an optimized view to prioritize account outreach with context!
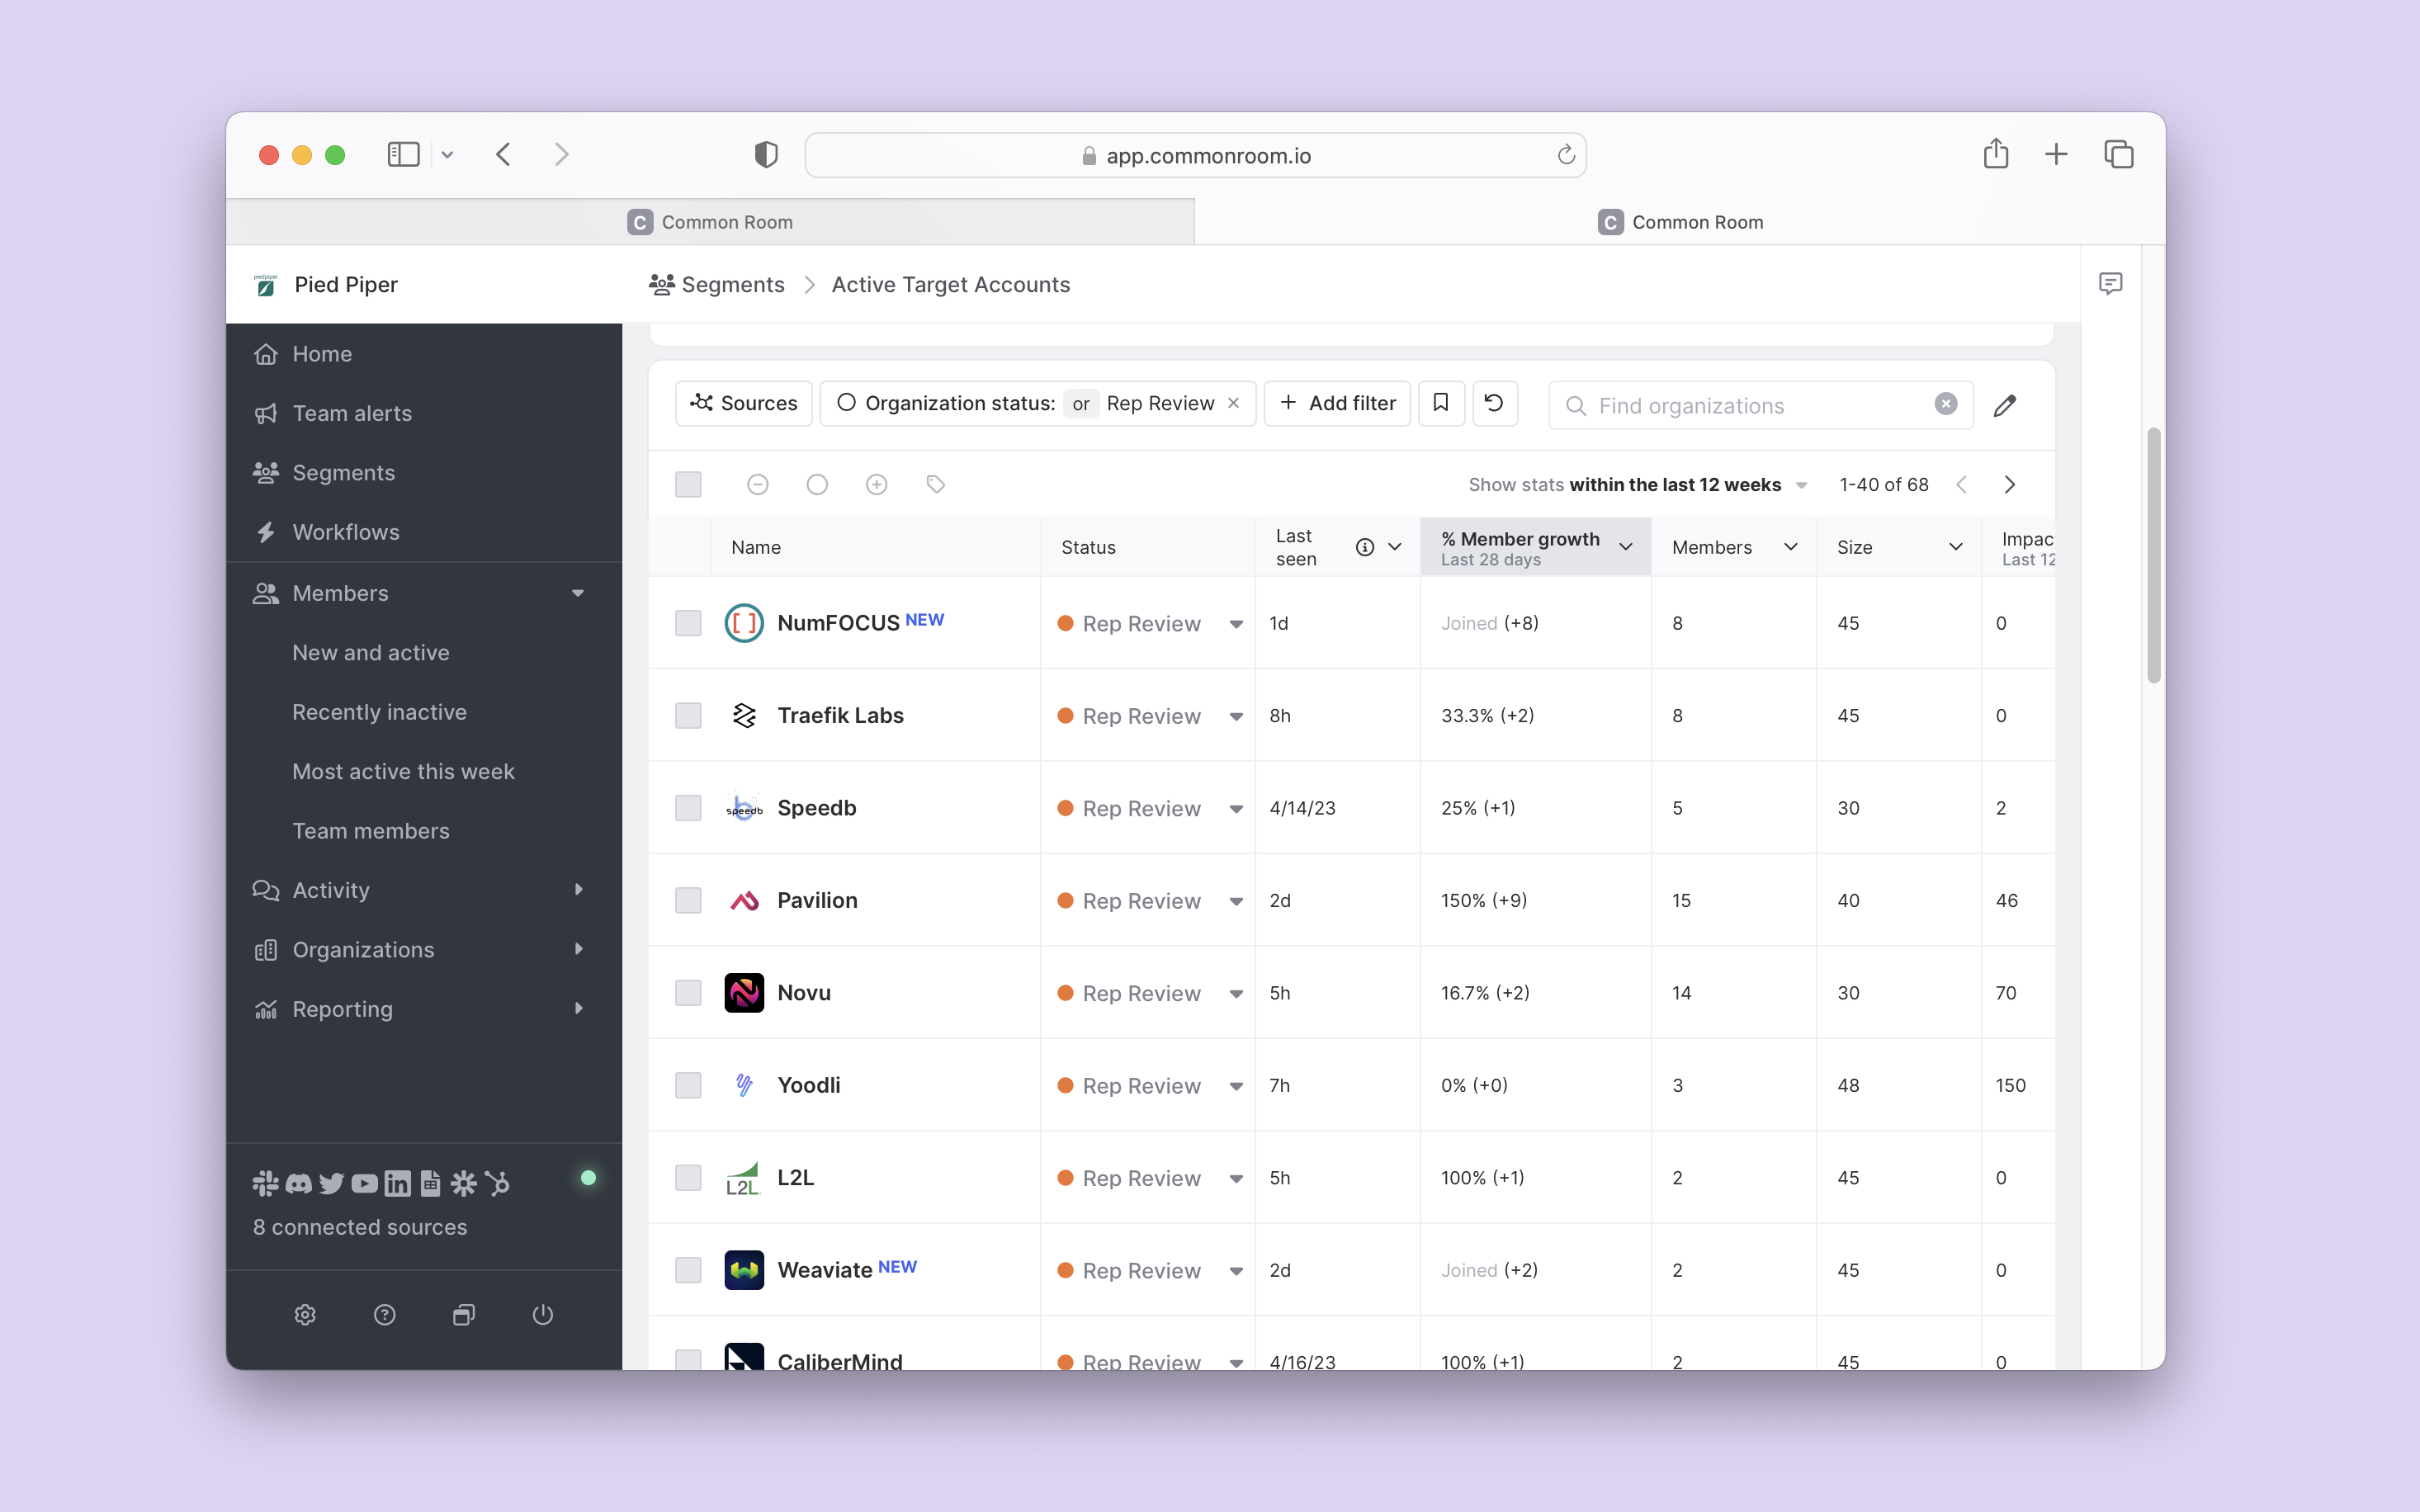
From here, our team can click into each account, review activity, and decide how to be helpful with follow-up.
After a team member takes action (like reaching out to an account), it's super easy to update the organization status to something like "Working." Click on the Status dropdown that aligns with an account and create a new status or select an existing one.
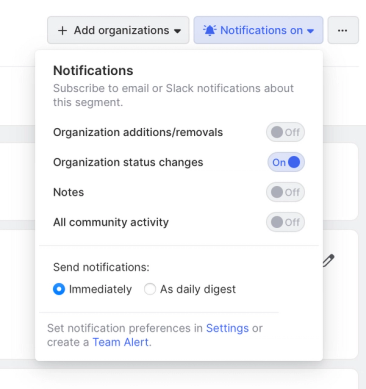
Step 5: Send automatic notifications
For our last step, we’ll add some automation to react in real-time.
We can click on the 🔔 Get notified dropdown option in our segment and turn on notifications for organization status changes.
Wrapping up
🥳 Congratulations, you've made it to the end!
To recap, we used this playbook to identify activity from target accounts across digital channels so our team can reach out with context. But we're just scratching the surface of what's possible with Common Room.
We want to hear about your use case and help you find the perfect playbook. Get in touch with us here. And if you haven't already, Request a demo.
We think you'd like these
Playbook
Replenish target accounts for ABM using recent activity
A stale list of target accounts leaves a lot to be desired.


Playbook
Map the stages of your dark funnel from problem-aware to engaged
Shed light on the dark funnel.


Podcast

How Temporal uses community insights to enrich sales
Mar 2nd, 2023·6min readRead the top takeaways from a recent discussion with Tim Hughes, Head of Sales at Temporal, on the benefits of infusing sales with insights from the community.