LinkedIn prospecting on easy mode
Find the signal from the noise on LinkedIn with half the effort.
Undoubtedly, the LinkedIn water cooler offers a rich source for prospecting.
Spot the followers in your ideal customer profile (ICP) reacting to your company content, and you’ve got a good chance of reaching out and getting a reply.
In practice, however, this workflow is not so easy. It takes a lot of manual effort to sift through each post, click to see who reacted, and filter out your team, customers, job seekers, etc. And that’s all before even sending a single message.
There’s a better, more automated way. In this playbook, we’ll show you how to extract the signal from noise on LinkedIn so you can pinpoint the perfect prospects to reach out to in half the time.
What you’ll need
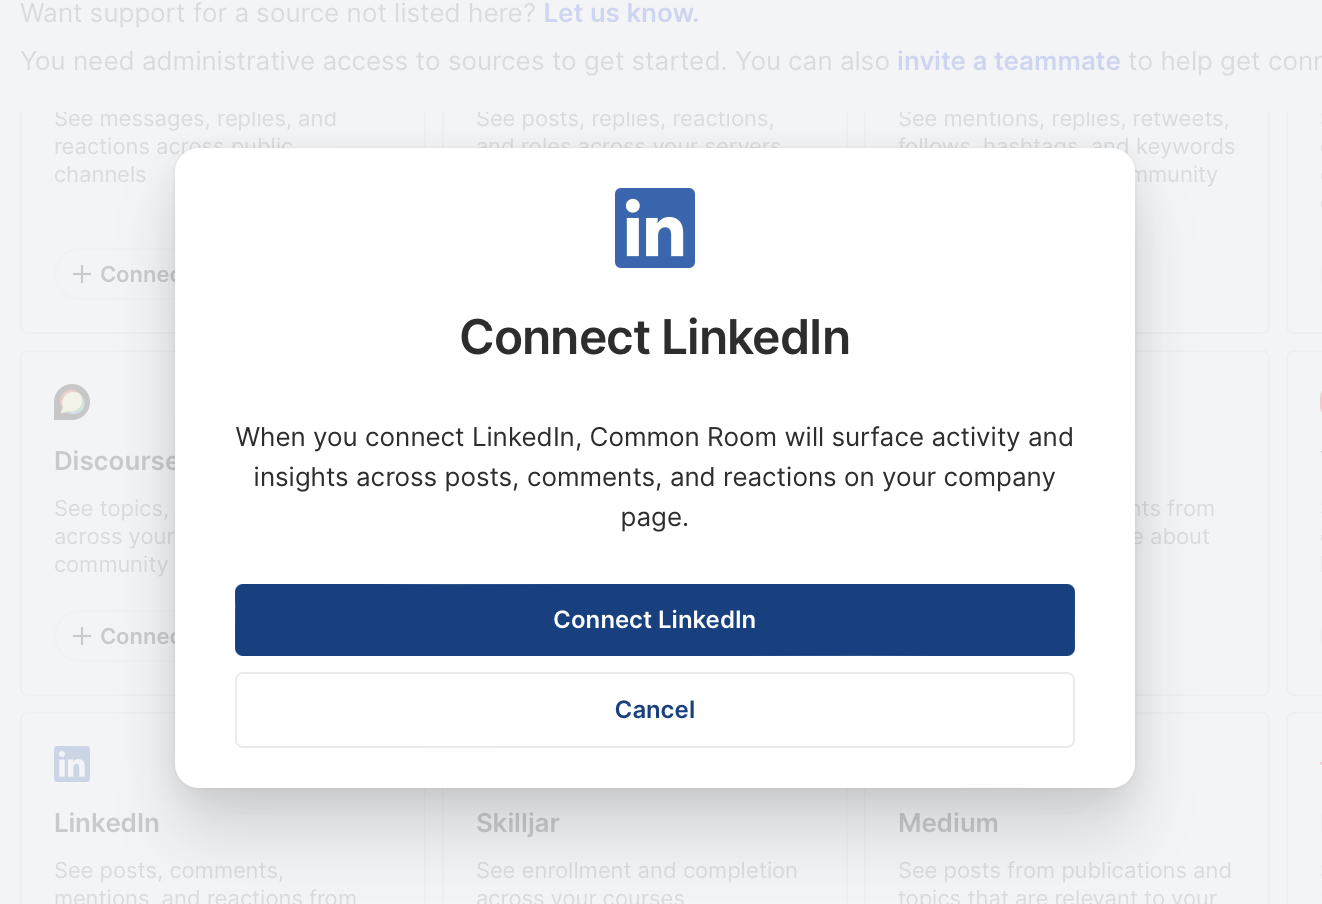
Step 1: Connect LinkedIn to Common Room
We’ll first want to connect LinkedIn to Common Room to start ingesting activity data from members engaging with our content.
To do that, jump over to the Settings menu and choose Connect LinkedIn.
After clicking to connect, you’ll be asked to authenticate LinkedIn. We’ll need admin privileges to grab the URL and authenticate LinkedIn.
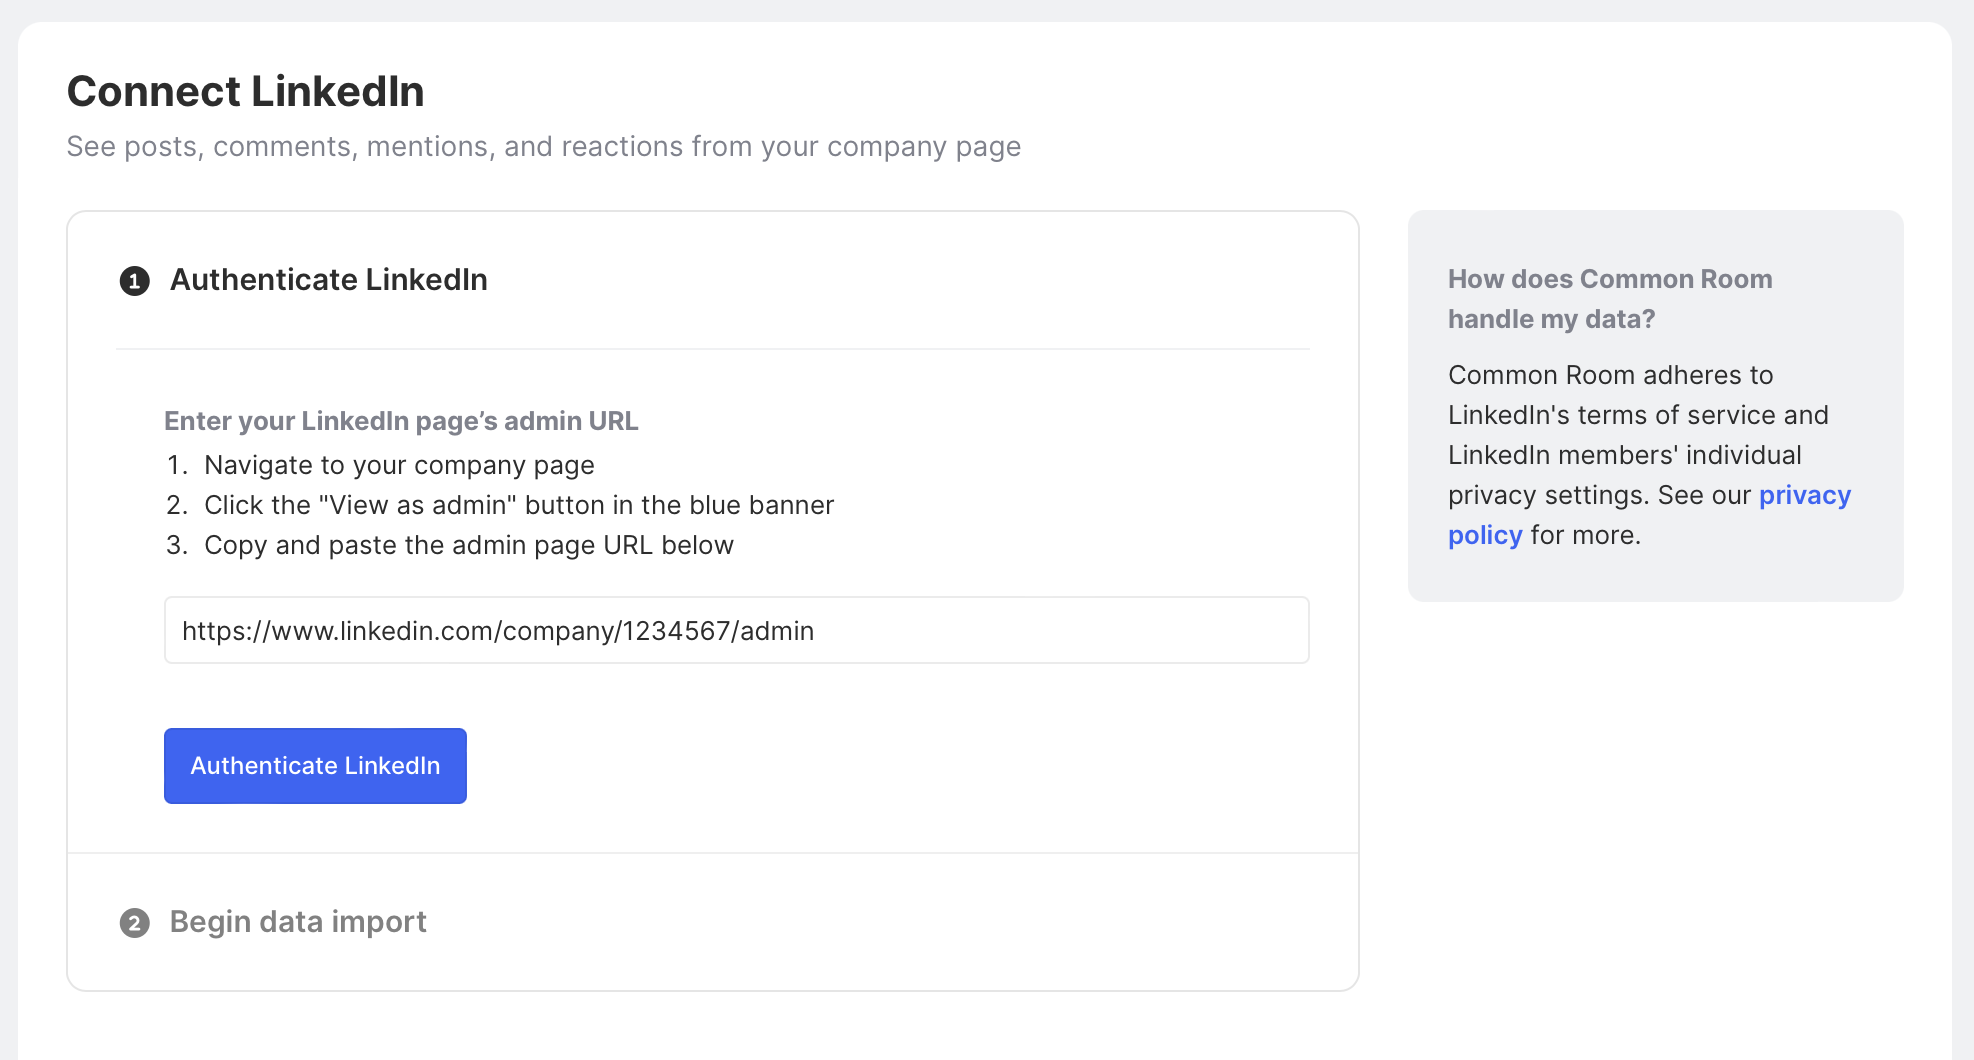
Once LinkedIn is authenticated, data import will begin, and you’ll start to see activity from LinkedIn appear in Common Room.
Step 2: Create a new segment for prospecting warm leads
With data flowing into Common Room via LinkedIn, firmographic data is automatically added to each person interacting with your content. So you’ll be able to add filters to identify where someone works and information like company size, funding raised, location, and dozens of other data points.
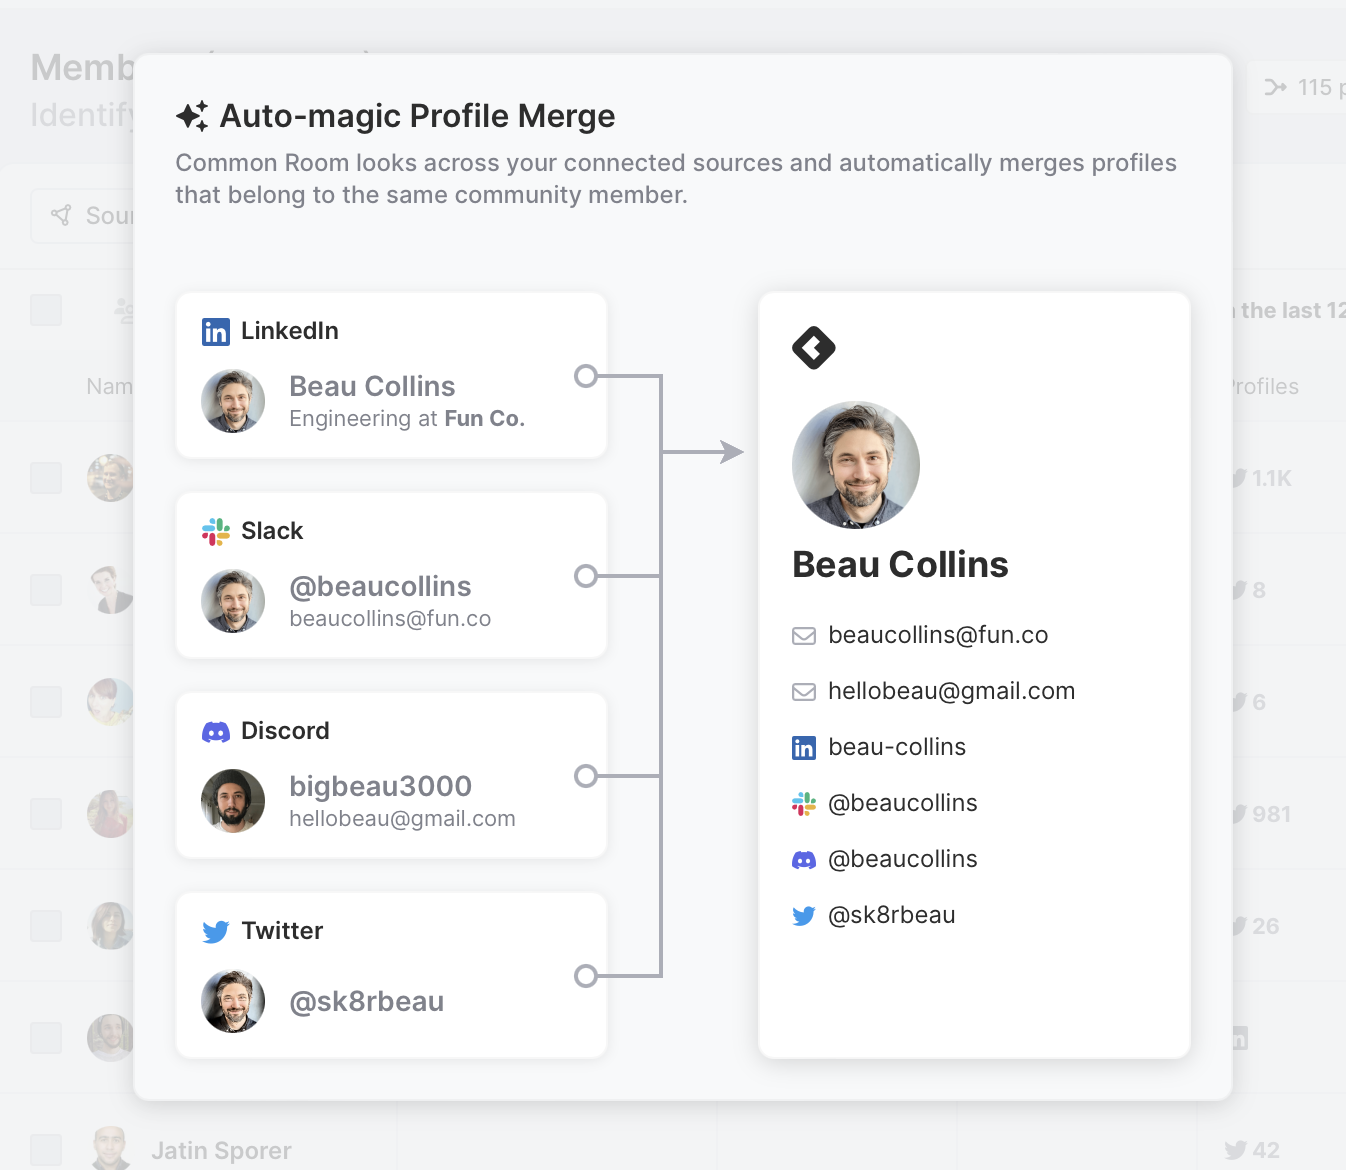
Even better, when you connect multiple sources like Twitter, your Slack community, or your CRM (HubSpot or Salesforce), Common Room automatically does the heavy identity resolution work, giving you a single view of each member. This allows us to add filters like “is not a customer.”
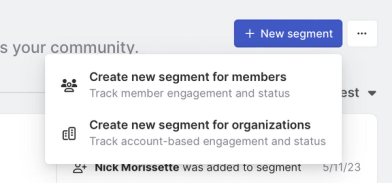
We can head over to the Segments menu, where we’ll create a view for our team that filters signal from the noise on LinkedIn. And we’ll click + New segment and select a new “members” segment to create our view.
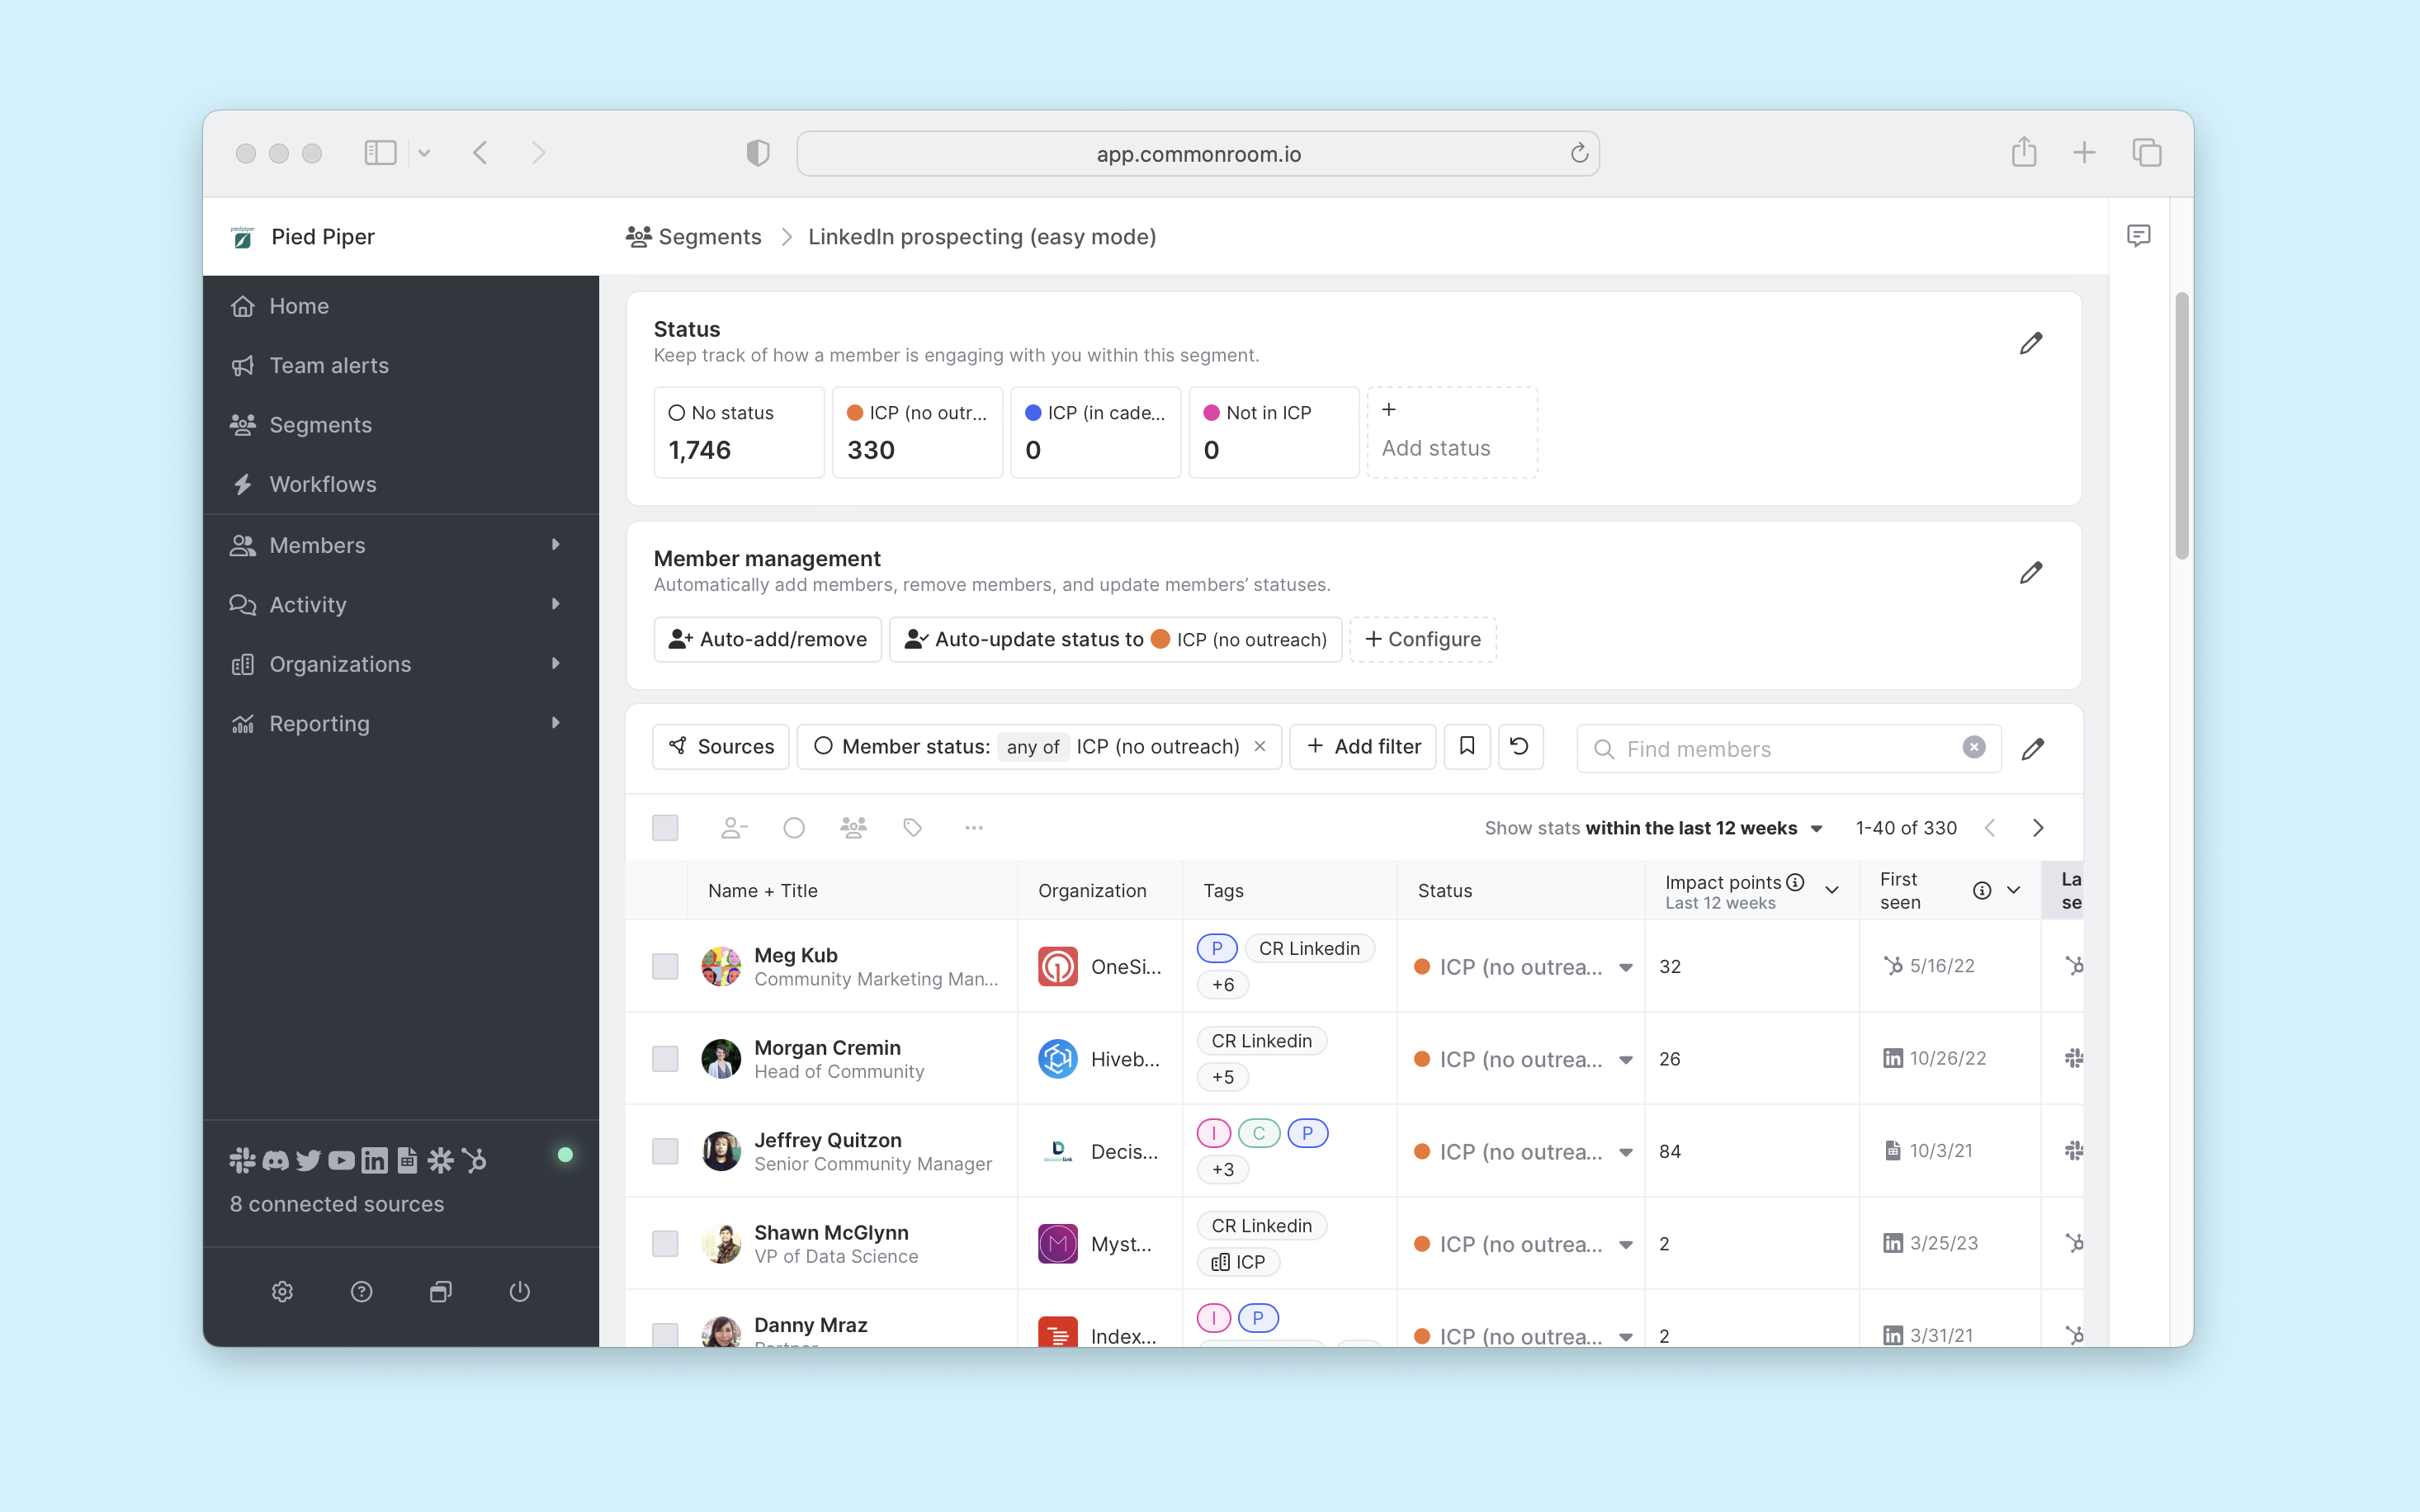
We’ll name our new segment accordingly and add statuses that mirror our workflow (e.g., ICP no outreach or Not in ICP).
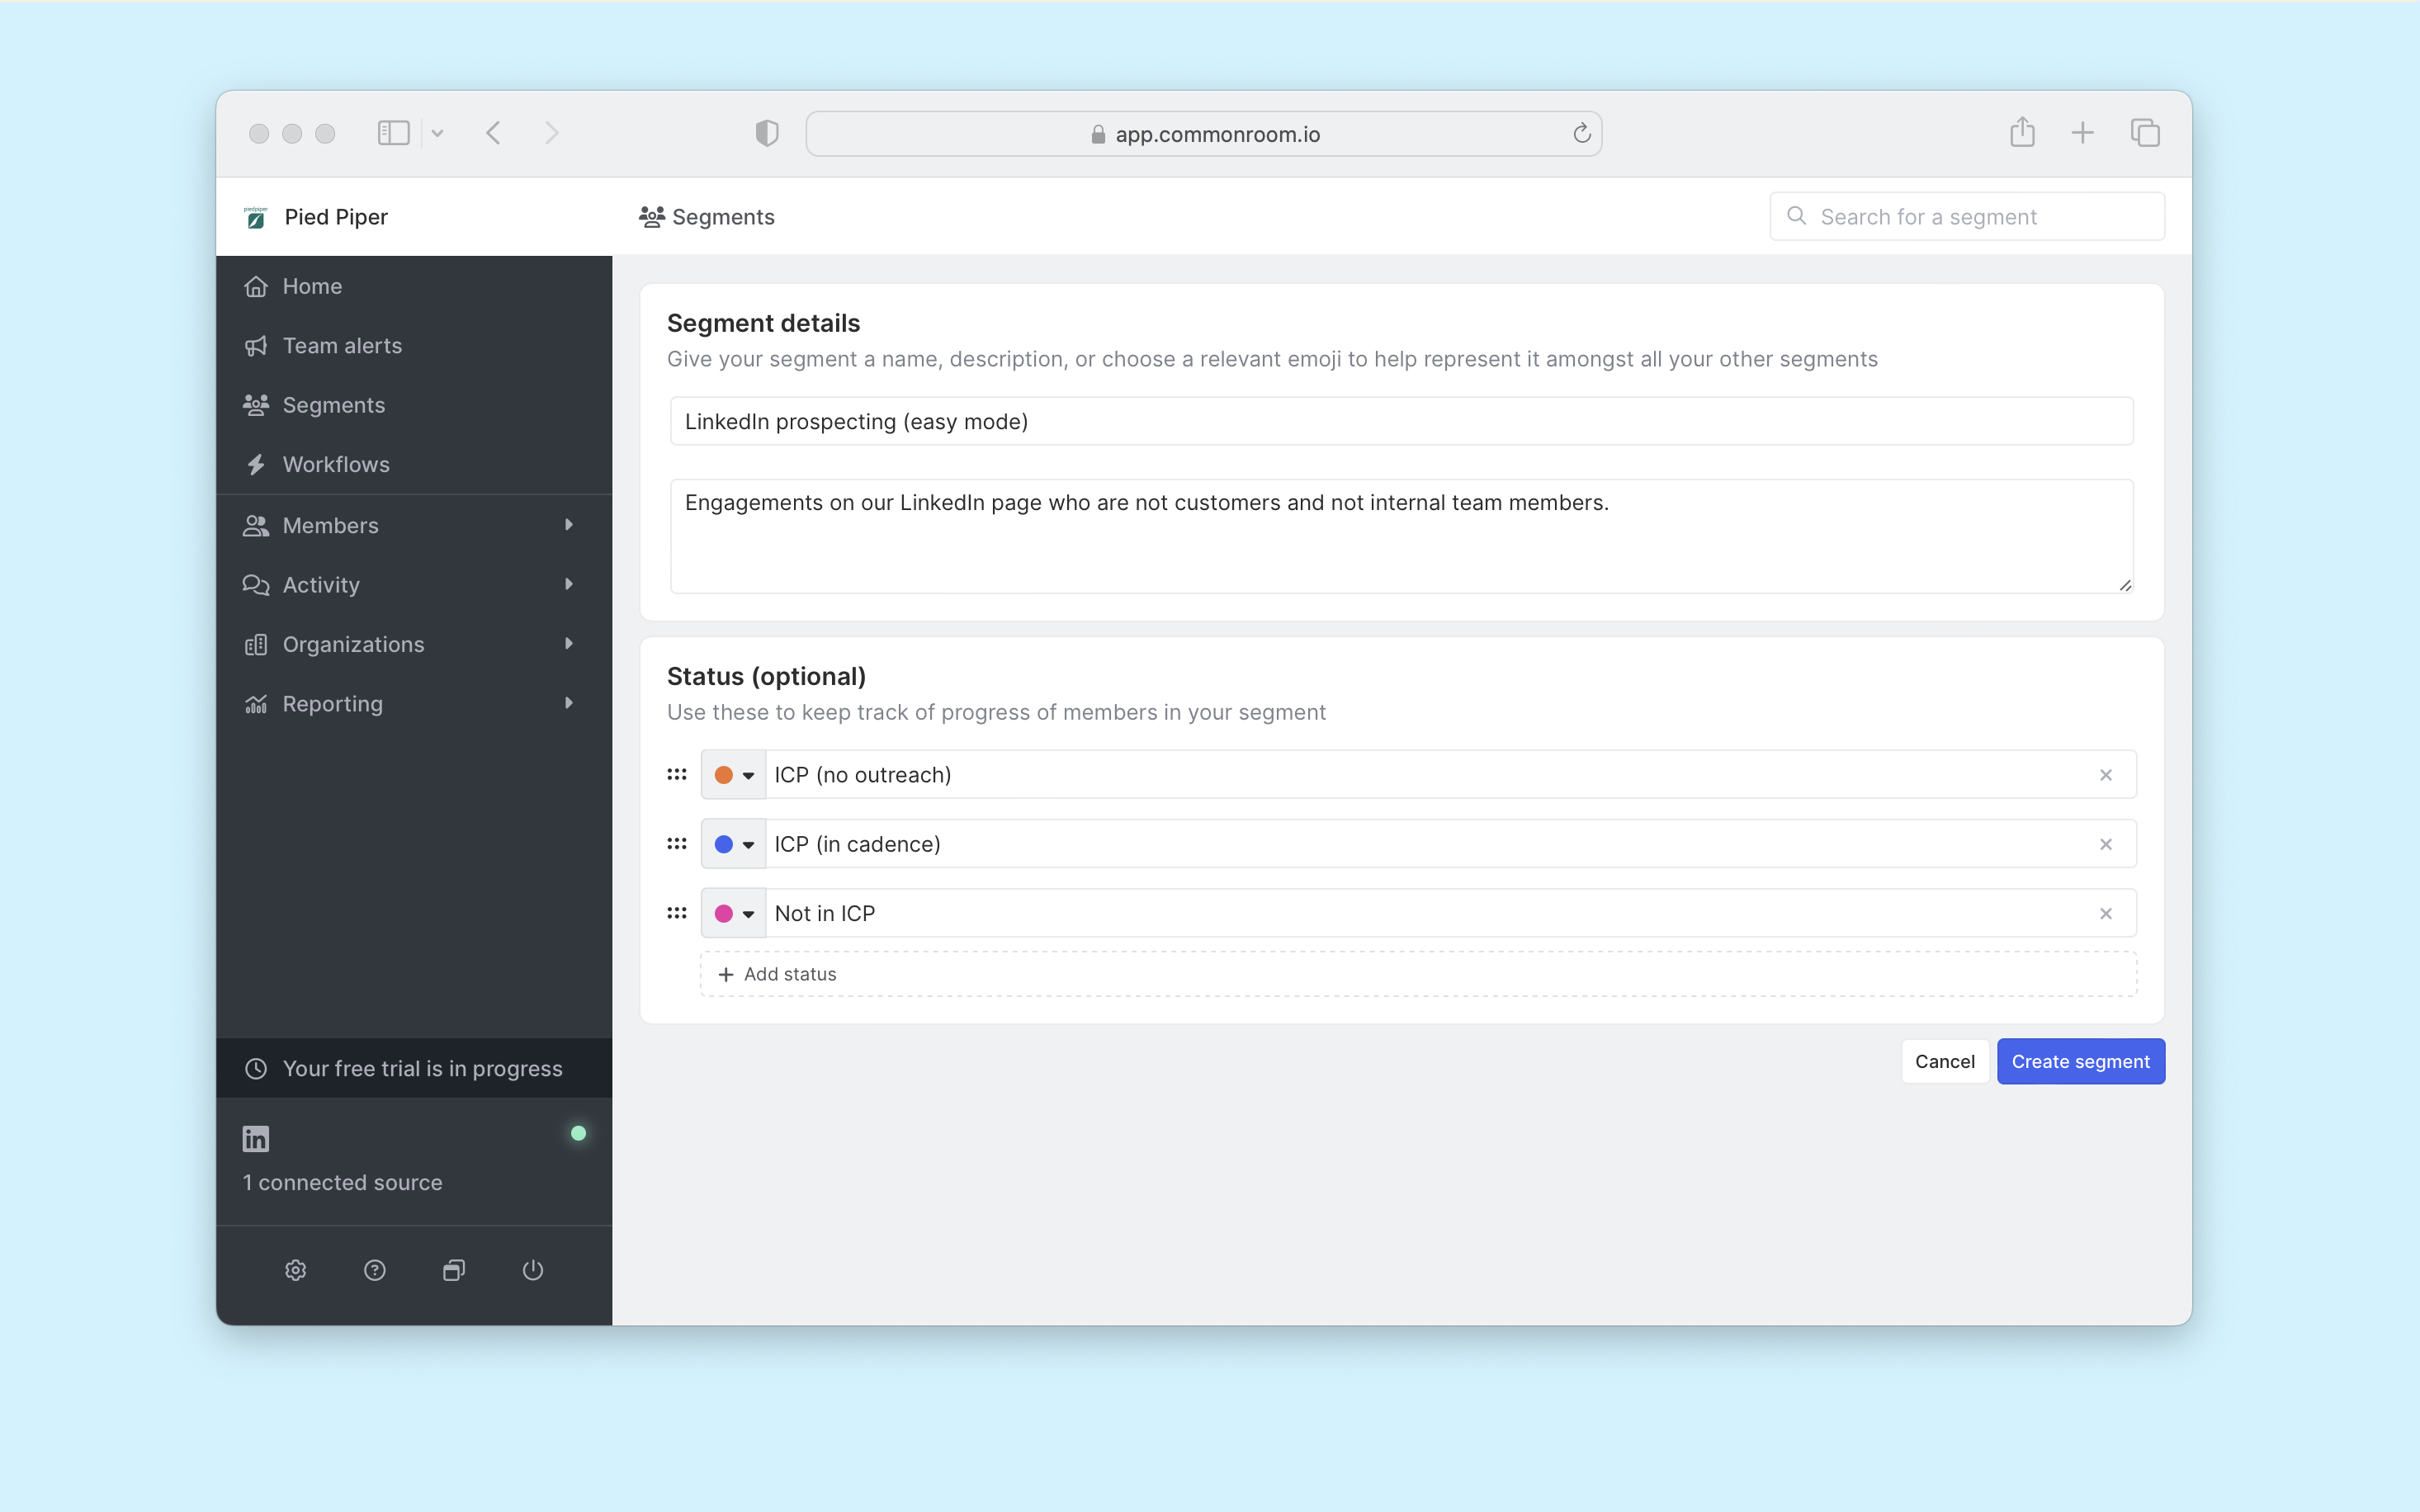
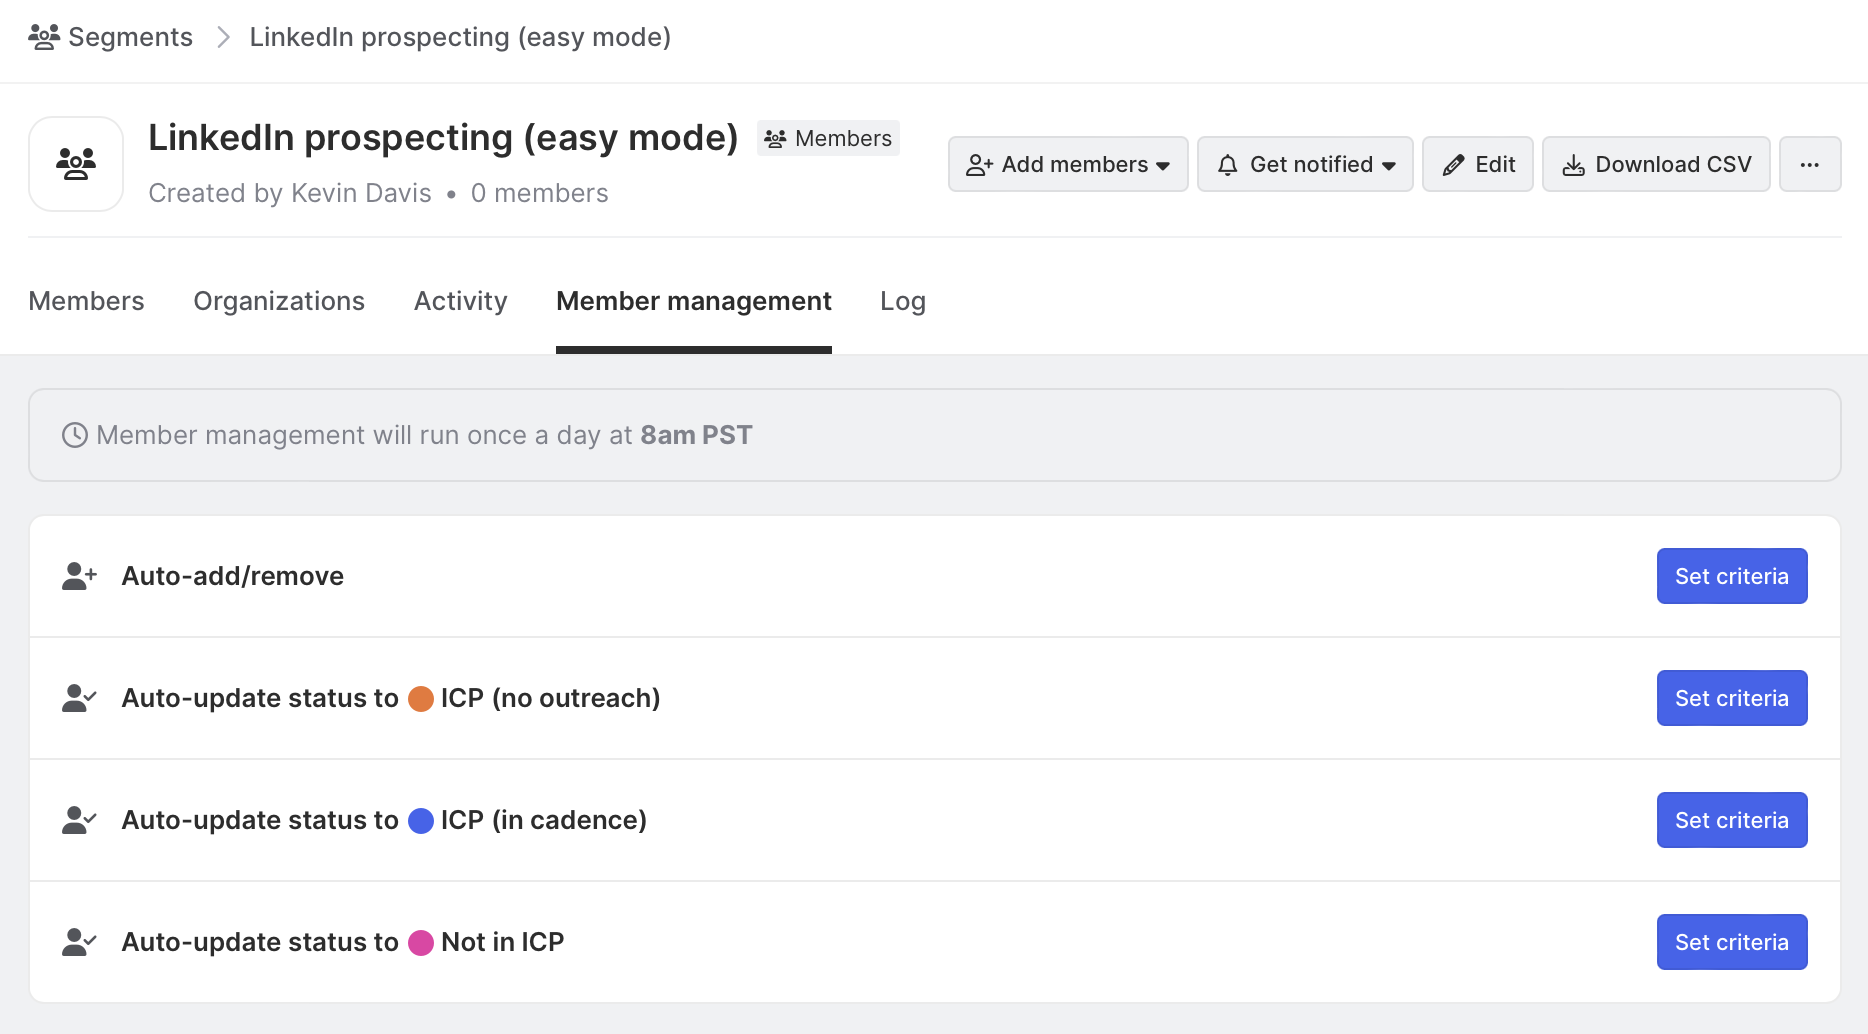
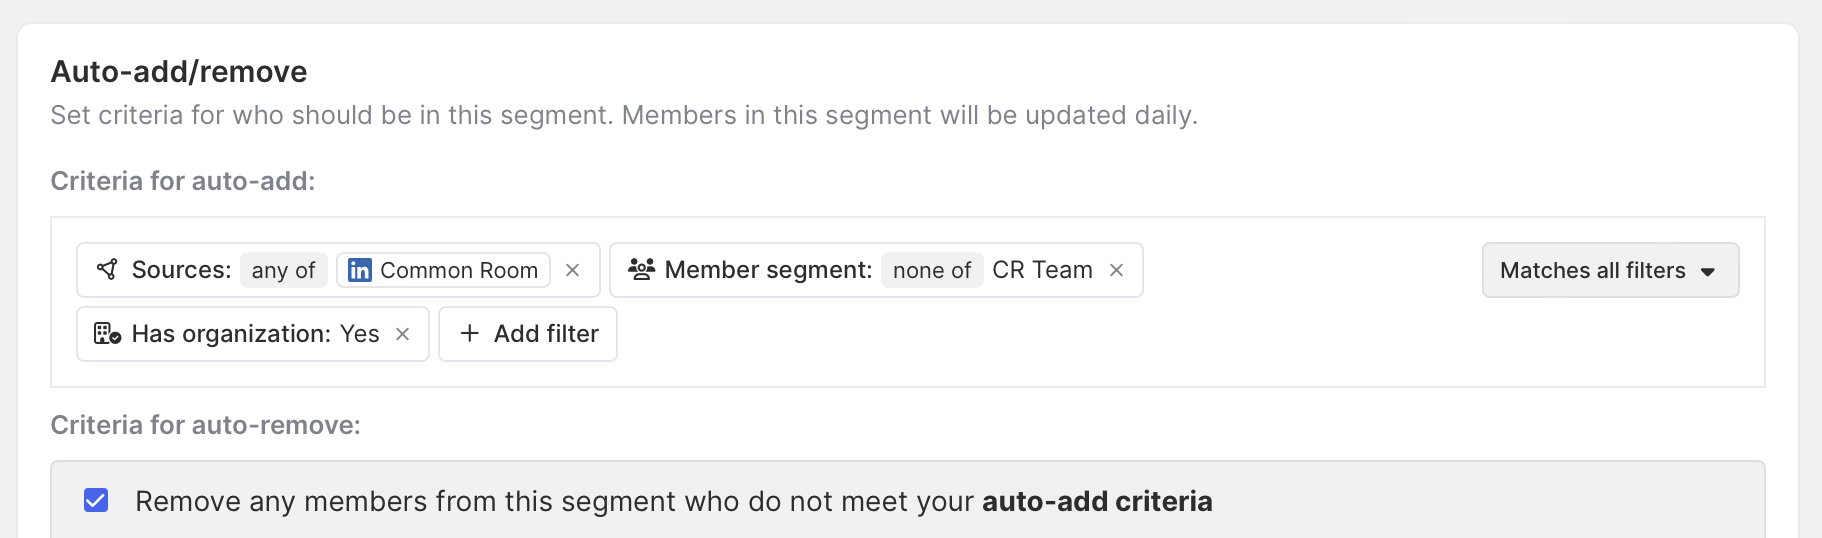
Our new segment is live, but we’ll need to add members. So we’ll click on the Member management tab and select to Set criteria to Auto-add/remove members.
We’ll set our criteria only to add members engaging on LinkedIn who are not part of our internal team and have a matched organization. By setting Has organization to Yes, we’ll get a good proxy to identify that firmographic information on the member has been identified (i.e., they work at a known company).
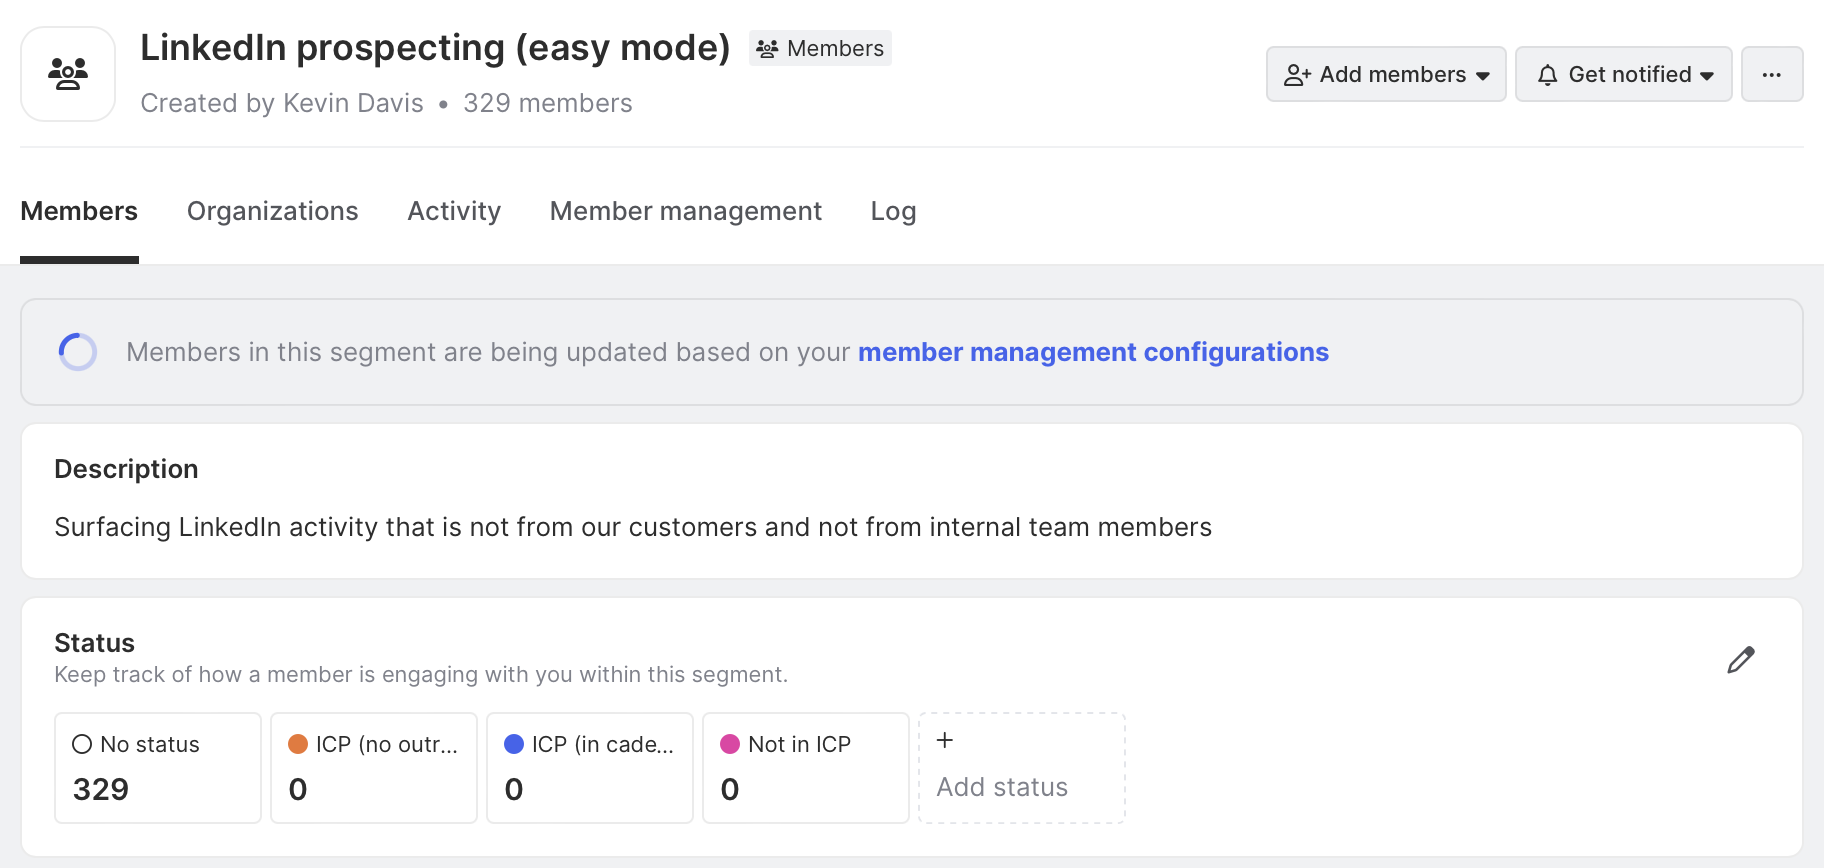
We’ll save this segment, and members will auto-magically begin to import.
Step 3: Set member status to track outreach efforts
For our next step, we’ll want to auto-add members to the different statuses we previously created.
Let’s return to Member management and set criteria for members who fit our ICP and have not yet been contacted. Click Set criteria for our no outreach status.
We’ll click to add a filter for organization size that’s 50+ and a role in marketing or sales, as this fits our ICP in this hypothetical.
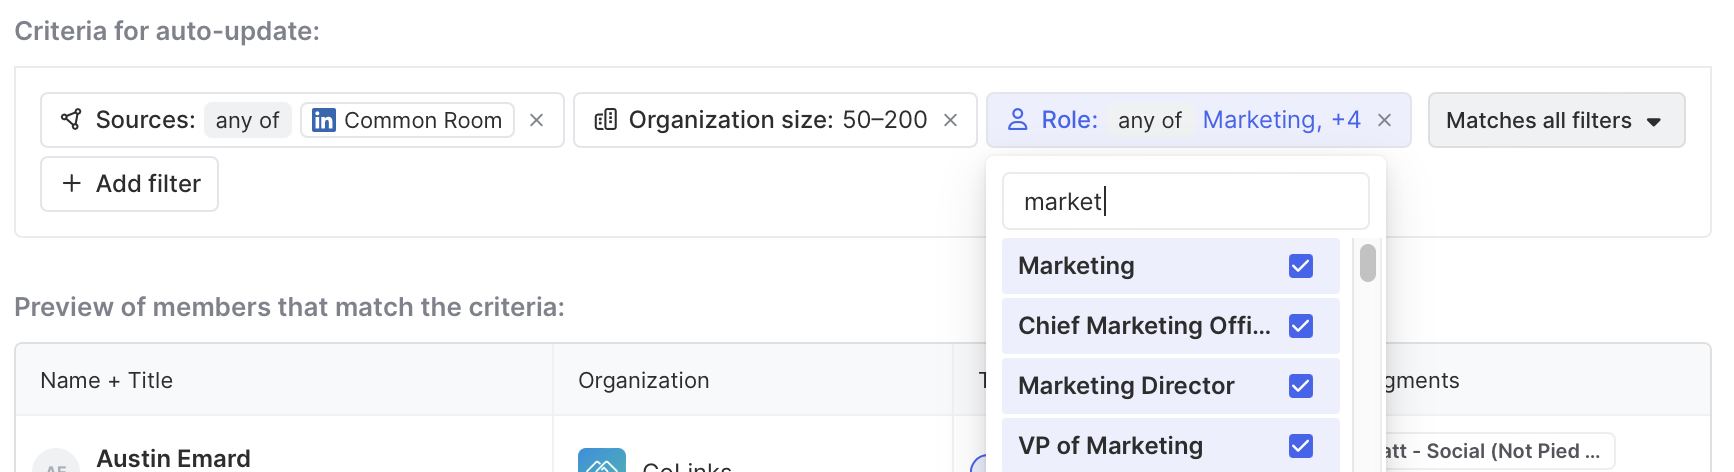
Once we click Save, these members will move into our prioritized outreach status.
With that, we now have a list of high-fit prospects for our team to look into and reach out to with context. But we’re not quite done yet.
Step 4: Create prioritized views for your team to triage
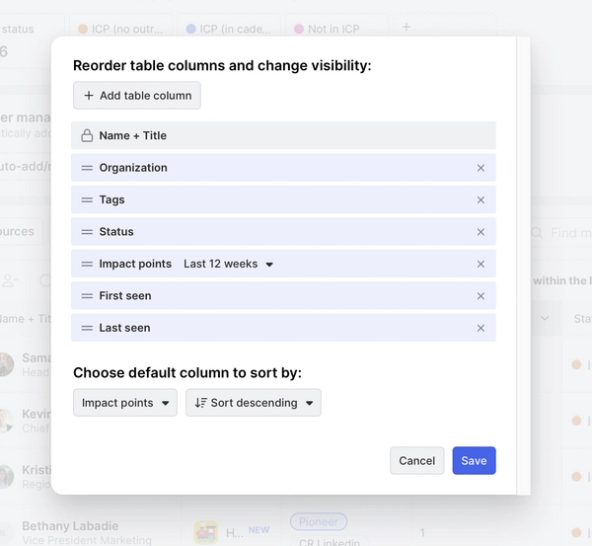
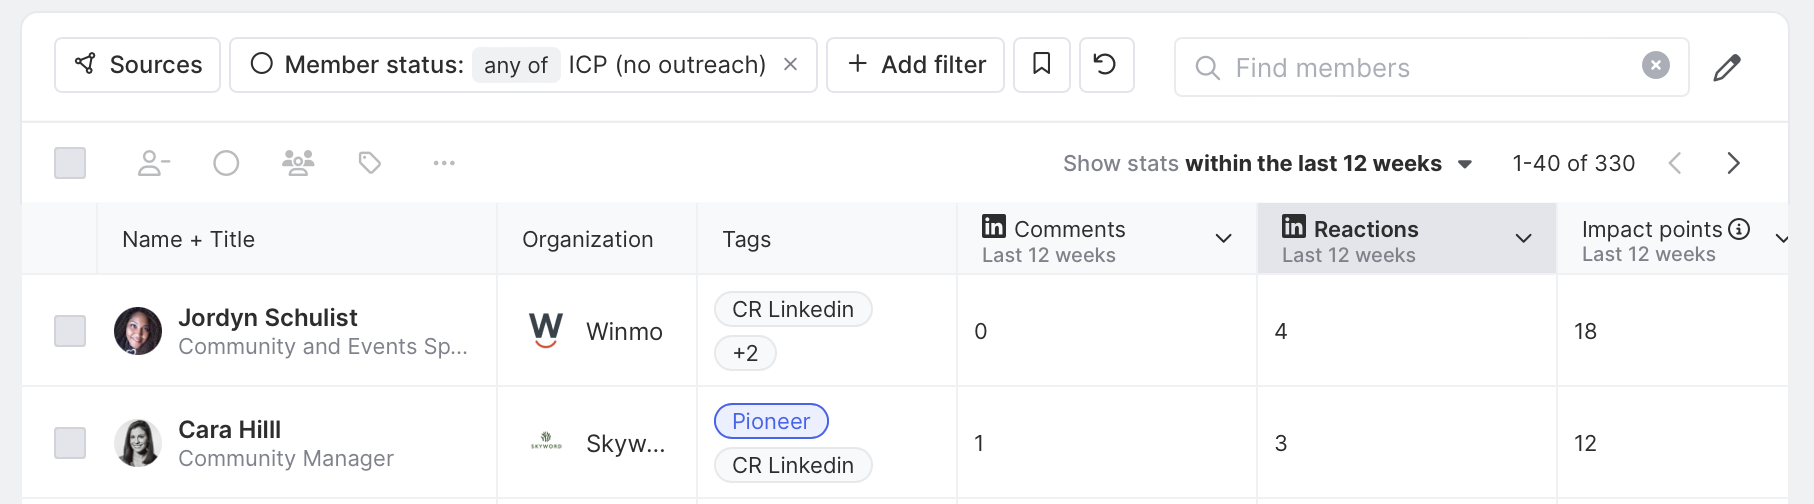
To make our team even more efficient with their outreach efforts, we can adjust and sort our columns to help with prioritization and context.
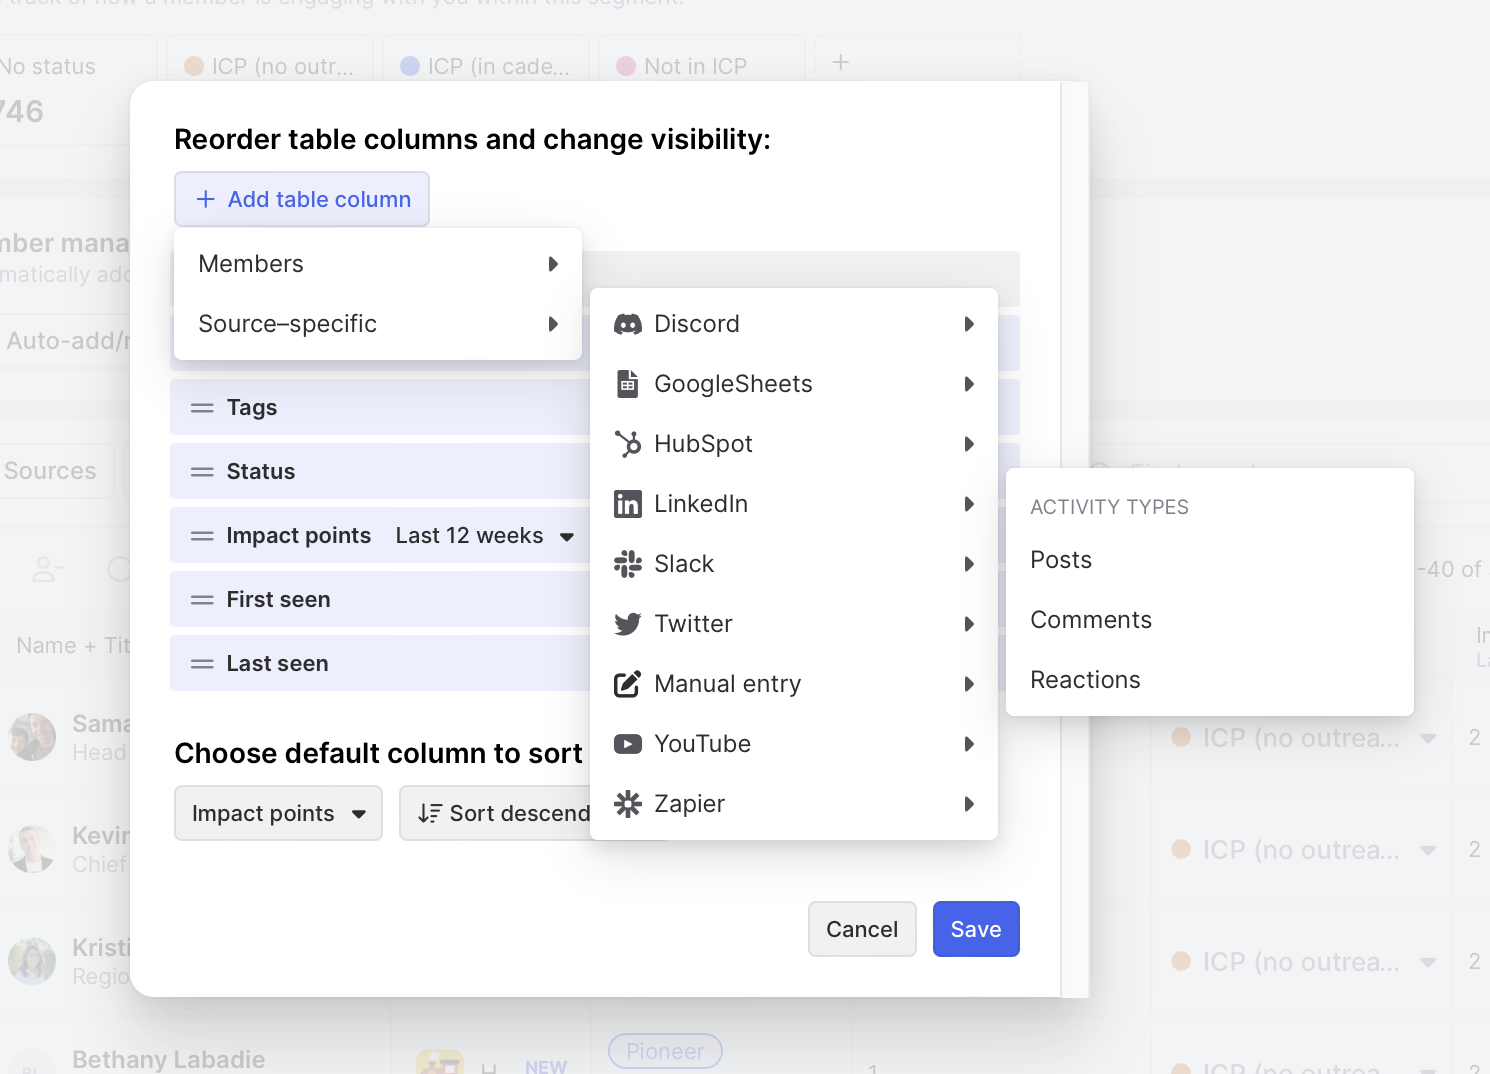
Because we’re looking at LinkedIn, we’ll want to add columns for LinkedIn-specific activity like reactions, comments, and posts. We can click the ✏️ icon in our member preview to add custom columns to our view.
Click + Add table column, select to include a source-specific column, find LinkedIn, and add a column for Comments. And then, we can repeat the same flow also to include Reactions.
After adding our custom columns, we can re-order accordingly and click Save.
Now, we have a prioritized view for our team to follow up on based on the volume of activity and recency.
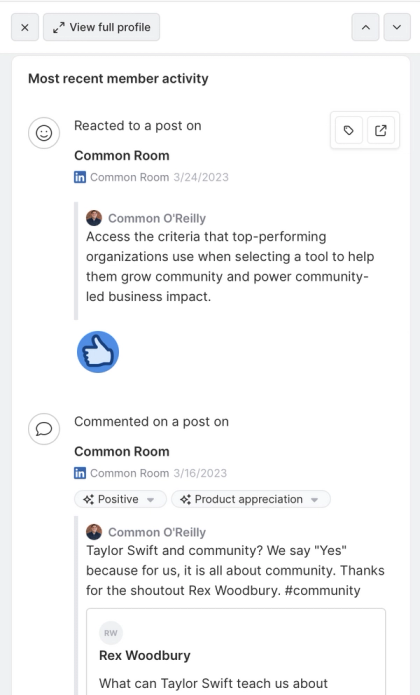
And when our team clicks into each member, they can see the context of what post was engaged with and other activity, so they can reach out with context.
Step 5: Add automated alerts to notify your team in real time
For our last step, we can create alerts so our team can reach out as soon as an action happens.
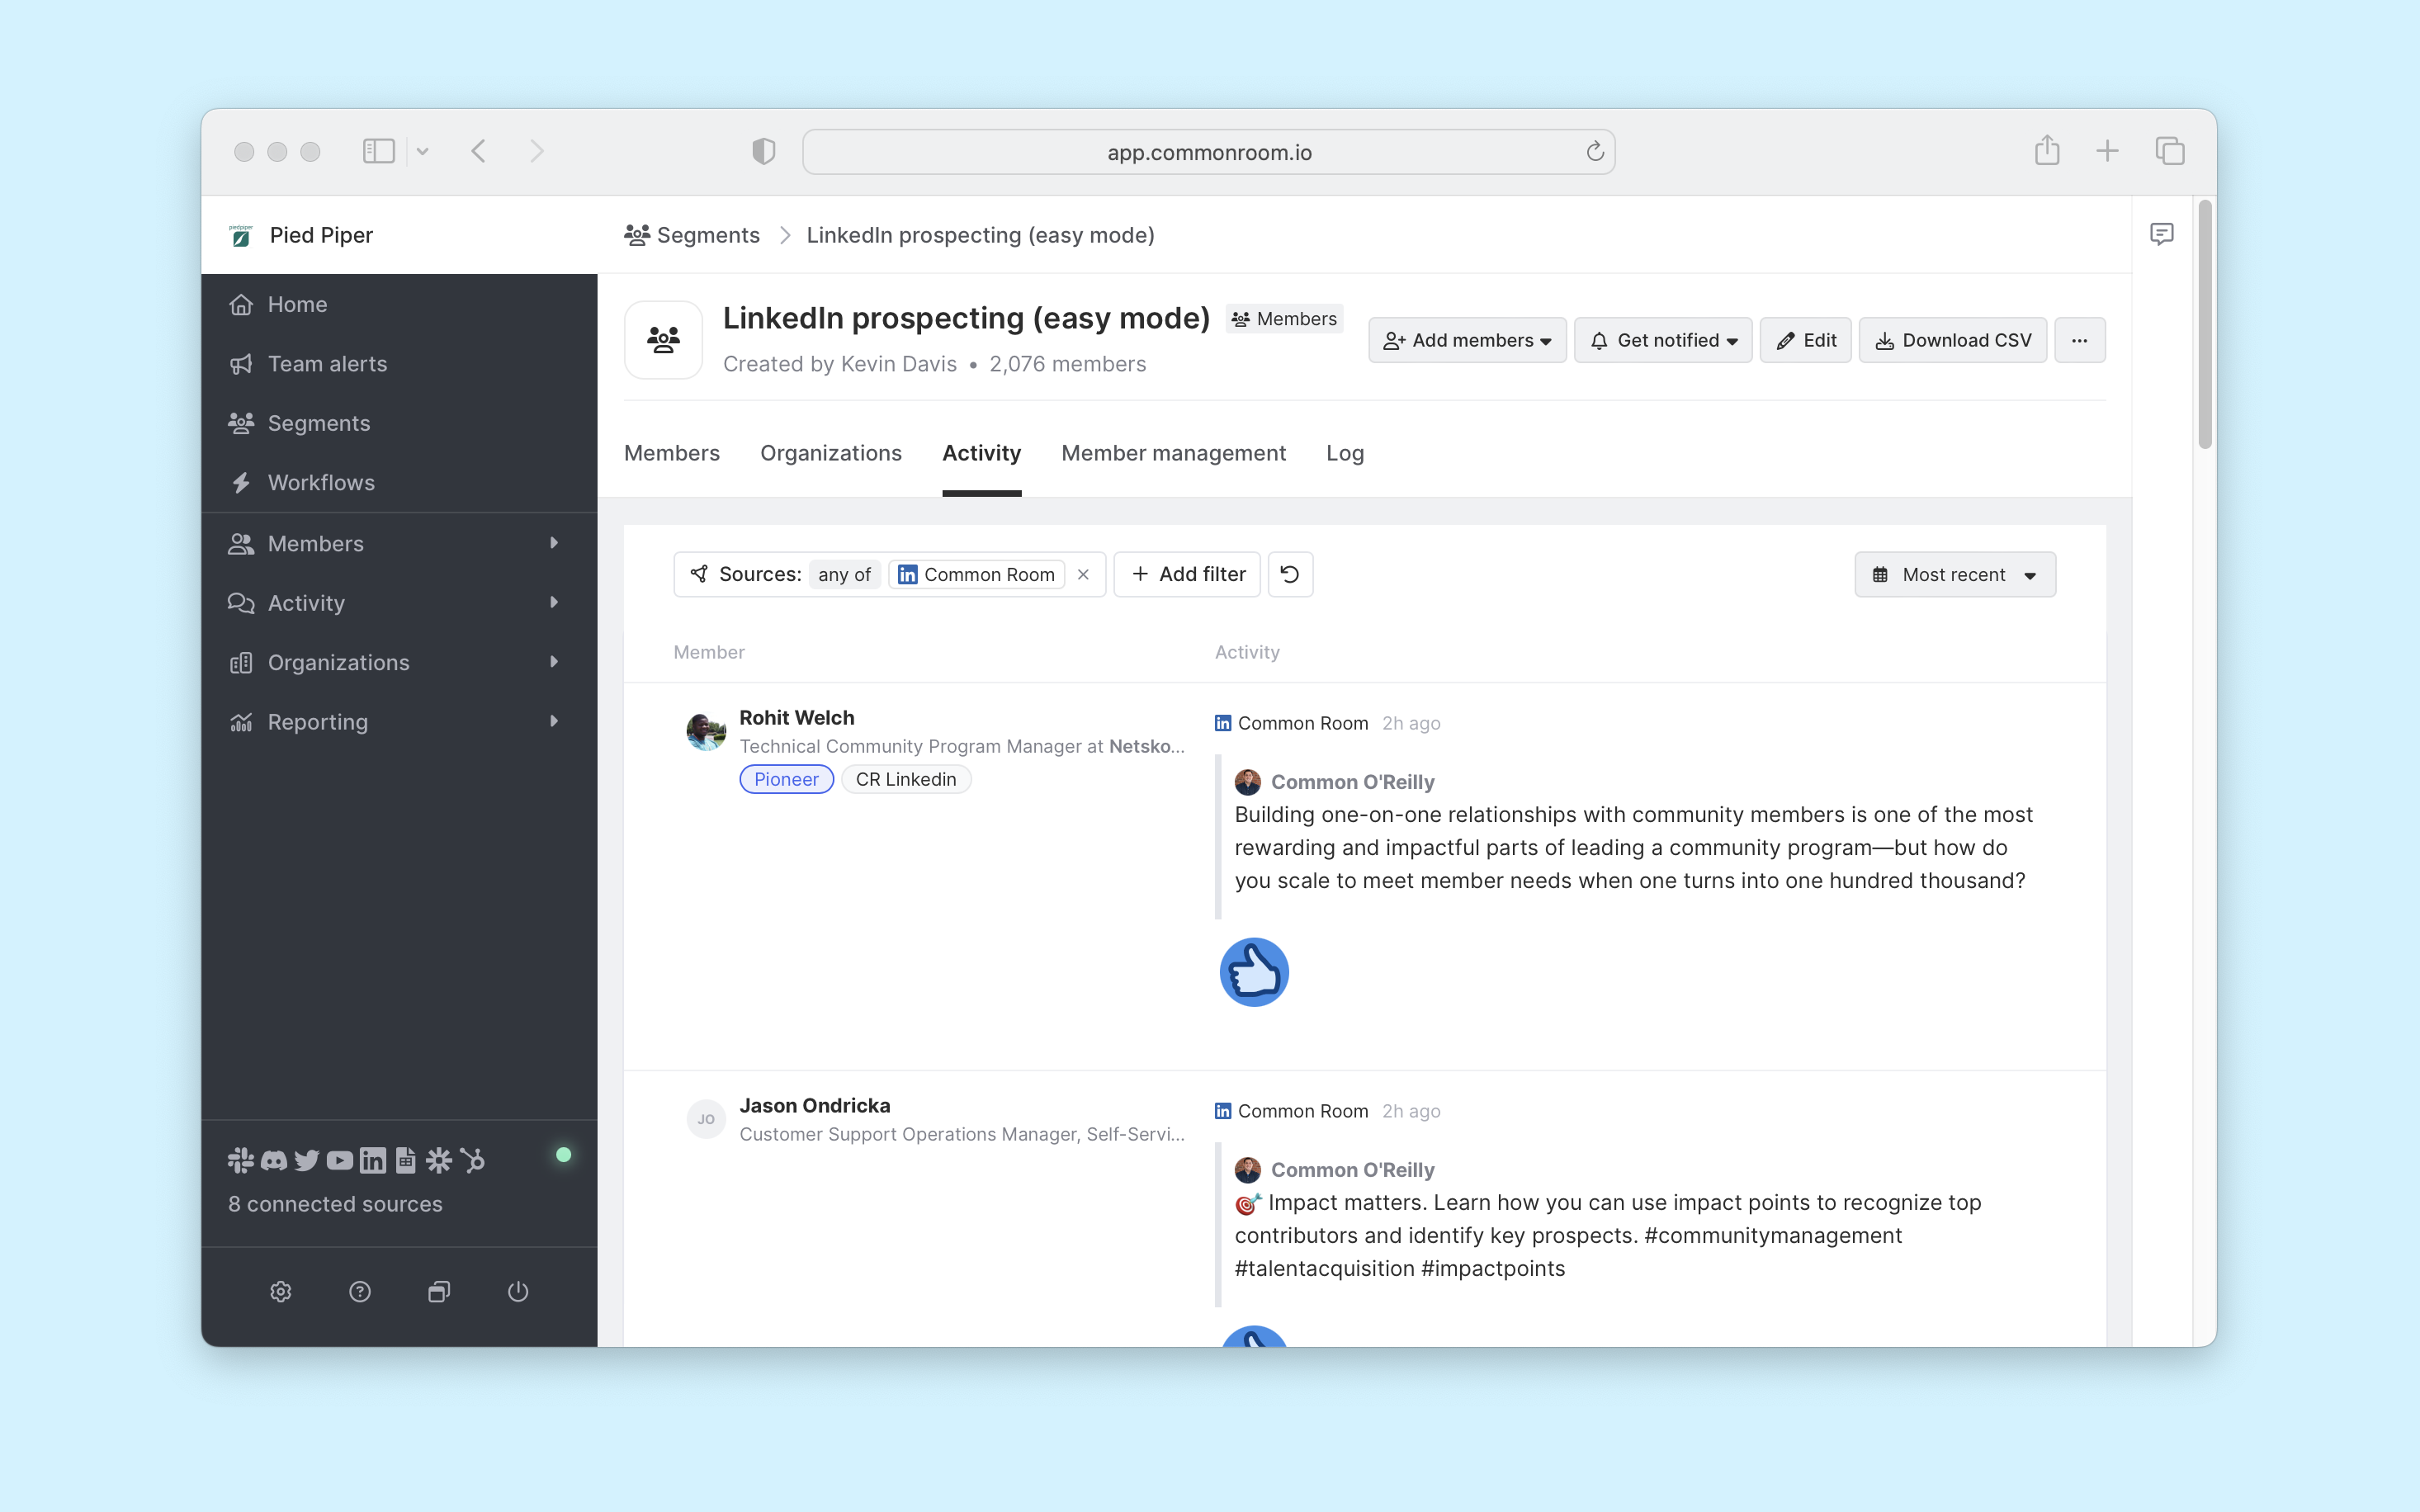
We can click on the Activity tab and chronologically see all the activity across our segment.
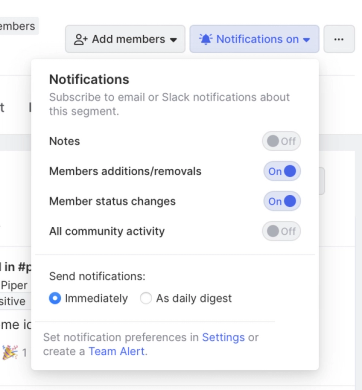
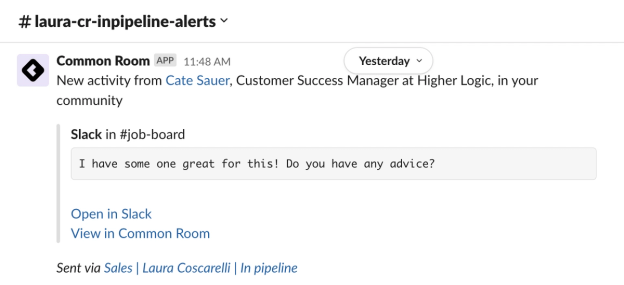
From here, we can click the Get notified dropdown and toggle on notifications for Member additions/removals and Member status changes.
Once your alerts are turned on, you and your team will get real-time notifications in the Slack channels you specified. Here’s what that looks like:
And last but not least, you can also connect Common Room to Salesforce to put them into email sequences via sales engagement software like Outreach or Salesloft. Pretty powerful stuff!
Wrapping up
We’ve made it to the end 😅
In this playbook, we used Common Room to help your go-to-market team tap into dark social channels like LinkedIn so they can reach out to potential customers in a helpful way. From here, you can do a ton more with Common Room, like connect more sources to get even more signals, identify more intent signals, and track how members are progressing through the funnel.
You can start running this exact playbook now for free. Request a demo or get some hands-on help from one of our experts.
We think you'd like these
Playbook
Find buyer intent keywords to track and send your team alerts
Find low-hanging fruit for your go-to-market teams.


Blog post
Shed light on the dark funnel with Common Room
Apr 27th, 2023·8min readLearn how Common Room uses digital engagment, CRM, and product usage data to transform your dark funnel into a powerful growth engine.Playbook
Replenish target accounts for ABM using recent activity
A stale list of target accounts leaves a lot to be desired.
